")
")


Search the Blog
Latest Comments
Beatrix
Experiment!
23. April 2024
The video doesn´t work (at least for me). If I click on "activate" or the play-button it just disapp...
Katrin
Spinning Speed Ponderings, Part I.
15. April 2024
As far as I know, some fabrics do get washed before they are sold, and some might not be. But I can'...
Kareina
Spinning Speed Ponderings, Part I.
15. April 2024
I have seen you say few times that "no textile ever is finished before it's been wet and dried again...
Katrin
How on earth did they do it?
27. März 2024
Ah, that's good to know! I might have a look around just out of curiosity.
I've since learned that w...
Heather Athebyne
How on earth did they do it?
25. März 2024
...though not entirely easy. I've been able to get my hands on a few strands over the years for Geor...
More from the Mini-Loom, Part 3: Heddling.
A loom with a front and back layer of threads is nice and fine, but a single shed not a weaving makes, or so. Which means... heddles.
Now in the very first, quickly-thrown-together setup, I had done a very, very bad job at making the heddles. There were only a scant dozen or so of them, if that many, but they all had a different length... which is a seriously bad idea for weaving. Especially since, see scaling issues, heddles with a slight length difference are annoying enough in full-size weaving, but the slight length difference will scale up with making the loom, and with it the shed, smaller.
Shed size, by the way, is another scale problem. If you could just have a miniature weaver or two use the miniature loom for demonstrations, you would have no problem with a shed that is to scale for the small loom. (Actually, it would solve almost all the problems. They could also do the loom setup, and spin the yarn. From miniature sheep wool, with finer fibres... ah, let's not go there.)
My hands and fingers, though, do not get smaller when I downsize a loom, and I have to pass yarn through the shed for the demo - so it needs to be large enough for this. The shed size of the natural shed is easy to adjust by changing the angle that the loom has against the wall (in my case, that angle is relatively fixed by the angle the side support ends have; they are equipped with rubber soles so the loom doesn't slip).
With the heddle stick in resting position, my heddle loops now have to be long enough to reach across the depth of the natural shed, and they should all be the same length as well, for good looks (important in a model) and good functionality (just as important).
Since I didn't trust myself to do this free-hand, I used aids. First of all, I figured out a good length for the heddles (in my case, a tiny bit less than the depth of the natural shed, because the little loom has a very generous one). I then found a suitable stick and a position for that stick on the back of the side supports that, when the heddle yarn is wound around the stick, would result in the proper length.
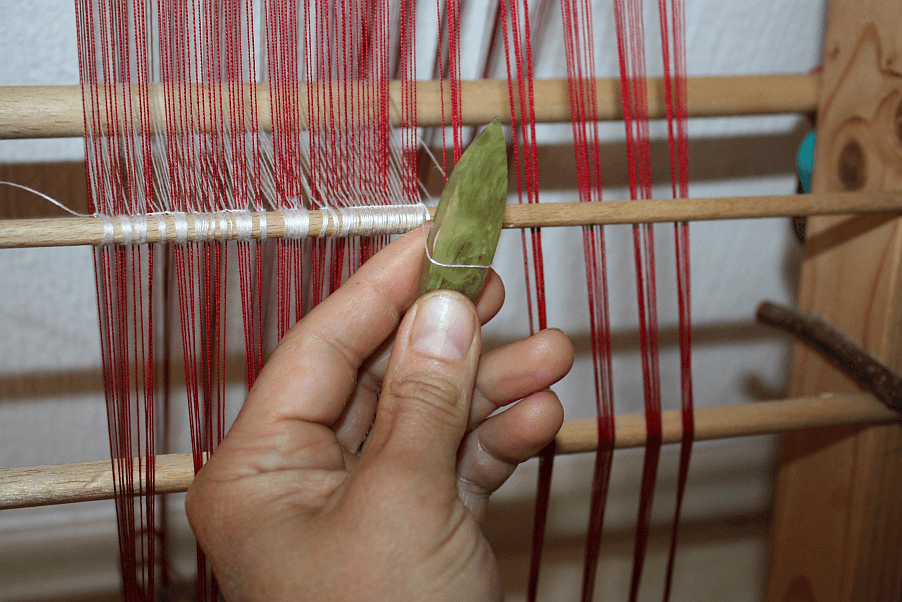
Heddling was then done bringing the heddle thread through the front layer, around the thread of the back layer, around the gauge stick at the back, back through the front layer (in the same slot between threads, obviously) and around the heddle stick. It took me a good while to figure out how to make the knot consistently, so the left part of the heddle rod looks not as nice as the right part, but ah. I thought about doing it once more, all nicely... and then decided against it.
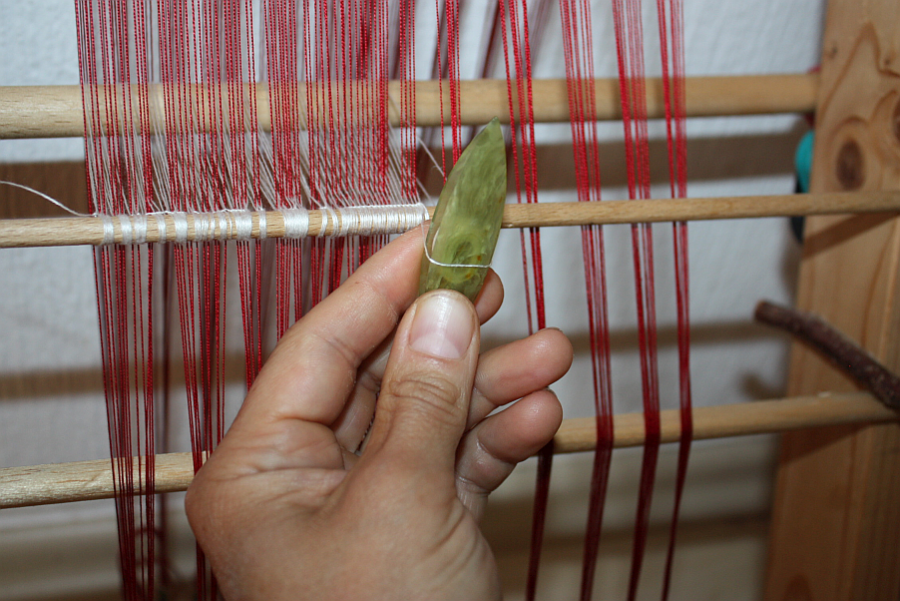
By the way: it is ridiculously easy to make a heddling mistake. Ridiculously easy. My respect for all those weavers who are setting up looms without any mistake went up a few notches again when I was doing this.
Now in the very first, quickly-thrown-together setup, I had done a very, very bad job at making the heddles. There were only a scant dozen or so of them, if that many, but they all had a different length... which is a seriously bad idea for weaving. Especially since, see scaling issues, heddles with a slight length difference are annoying enough in full-size weaving, but the slight length difference will scale up with making the loom, and with it the shed, smaller.
Shed size, by the way, is another scale problem. If you could just have a miniature weaver or two use the miniature loom for demonstrations, you would have no problem with a shed that is to scale for the small loom. (Actually, it would solve almost all the problems. They could also do the loom setup, and spin the yarn. From miniature sheep wool, with finer fibres... ah, let's not go there.)
My hands and fingers, though, do not get smaller when I downsize a loom, and I have to pass yarn through the shed for the demo - so it needs to be large enough for this. The shed size of the natural shed is easy to adjust by changing the angle that the loom has against the wall (in my case, that angle is relatively fixed by the angle the side support ends have; they are equipped with rubber soles so the loom doesn't slip).
With the heddle stick in resting position, my heddle loops now have to be long enough to reach across the depth of the natural shed, and they should all be the same length as well, for good looks (important in a model) and good functionality (just as important).
Since I didn't trust myself to do this free-hand, I used aids. First of all, I figured out a good length for the heddles (in my case, a tiny bit less than the depth of the natural shed, because the little loom has a very generous one). I then found a suitable stick and a position for that stick on the back of the side supports that, when the heddle yarn is wound around the stick, would result in the proper length.
Heddling was then done bringing the heddle thread through the front layer, around the thread of the back layer, around the gauge stick at the back, back through the front layer (in the same slot between threads, obviously) and around the heddle stick. It took me a good while to figure out how to make the knot consistently, so the left part of the heddle rod looks not as nice as the right part, but ah. I thought about doing it once more, all nicely... and then decided against it.
By the way: it is ridiculously easy to make a heddling mistake. Ridiculously easy. My respect for all those weavers who are setting up looms without any mistake went up a few notches again when I was doing this.
Comments
No comments made yet. Be the first to submit a comment