Latest Comments

Katrin Hieroglyphs.
23. Februar 2024
Yes, that would sort of fit that aspect - but you can also go from bits of woods to sticks if you ar...
Bruce Hieroglyphs.
23. Februar 2024
I think the closest English equivalent would be 'Down the rabbit hole'. It has one entrance (No, not...
Harma Spring is Coming.
20. Februar 2024
I'm definitely jealous! Mine disapeared except for one pathetic little flower. But the first daffodi...
Gudrun Rallies All Over Germany.
23. Januar 2024
Vielen Dank für den Beitrag. Ja, wir müssen darüber reden, gegen das Vergessen. Zum Glück haben mein...
Anne Decker Aargh.
17. Januar 2024
This is less likely to have an effect on your personal samples as you likely wrap the same way for a...
FEB.
19
7

Warp Weighted Loom Thoughts.

A long, long time ago, I made this little model of a warp-weighted loom, and after a few more years, I set it up again properly, trying to scale things down as well as possible.


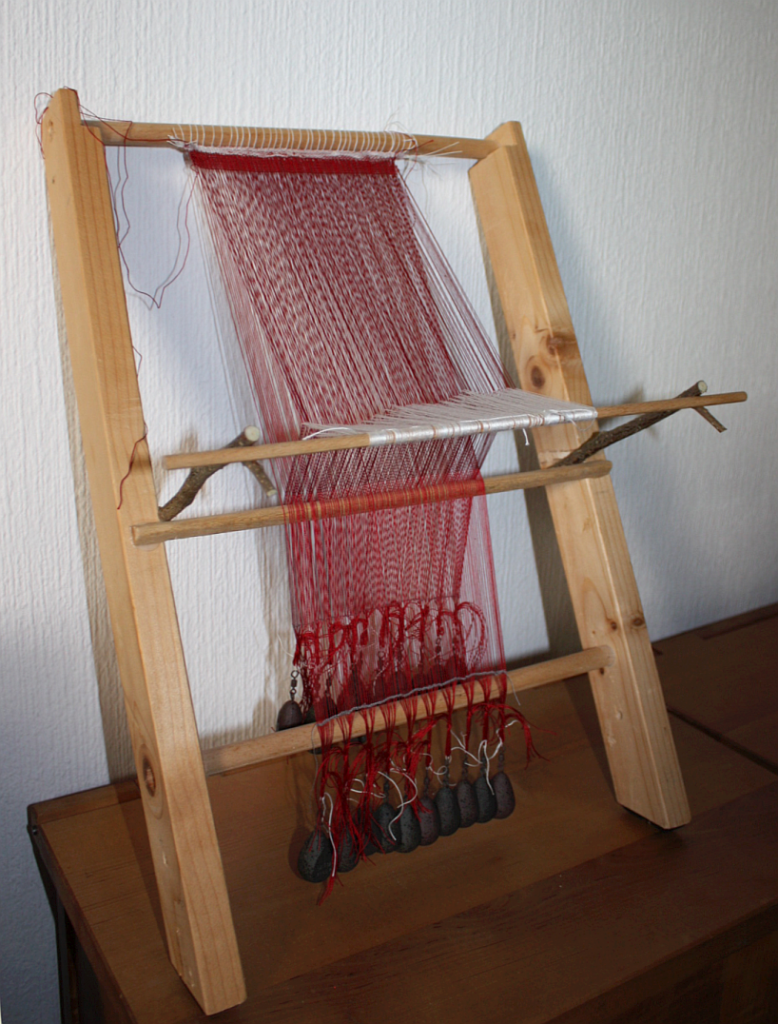
The model has come in handy for a lot of occasions now - it's the perfect way to very quickly explain how a warp-weighted loom works, and much easier to transport than a full-size one. For weaving purposes, though... it is obviously not the most suitable thing.

For actual weaving on a warp-weighted loom, you need a full sized version. And due to some people putting a flea into my ear, I've been pondering the question of how to organise a loom-weaving workshop, in logistical terms. Because you'd obviously need a loom for every weaver...

Now, in my personal opinion, the weaving itself is not the crux in learning how to work with a warp-weighted loom. Yes, you can of course muck up things wielding the shuttle and beater - but according to my experience, the stage where the main decision happens on whether you will end up with thread salad or a proper fabric is the setting up of the loom. Which also happens to have a lot more steps, and a lot more varied tasks, than the actual weaving itself (which is, basically, change shed, beat, insert weft, repeat). So to learn the how-to, I would actually aim to teach setting up... followed by a bit of weaving.

Whether the one or the other, though, you still need a loom for every weaver. Preferably one that is a good, efficient tool which would be suitable for production weaving. Also relatively cheap and easy to make (even without a woodworking workshop and lots of tools), suitable for normal-sized women (a plus would be easy adaptability for body size), and with the option of making it free-standing (in case the workshop area does not have enough wall space). It should be possible to take it completely apart for storage or transport, preferably with no single piece longer than 2.2 m.

The most important measurement for me, at the moment, is a suitable and sensible depth of the natural and artificial shed. How deep does the shed have to be, in order to weave comfortably? At one point, it will be too shallow to pass the shuttle (or weft ball, or whatever) through. (Obviously, the wider the fabric, the more fiddly this might get.) Making the shed deeper than necessary, though, means that you have to pull your heddle stick out further than necessary each time, and that is not very efficient.

Mathematics say that the depth of shed and height of loom will dictate the angle of the loom, and thus how far its bottom will stick out from the wall, and thus how far forward you will have to lean to pull the heddle stick, and how long the rests will have to be for the artificial shed - so, basically, everything.

Which means that construction-wise, deciding on a smart depth of shed is the most important thing... which also means that if any weavers with experience on a warp-weighted loom are among you, please let me know about your thoughts - and your experiences with shed depths!
0
FEB.
22
0

Hunting for Black.

I've run out of iron gall ink now, so it's time to get some more... or, to put it better, to make some more. Last time, I had a colleague make my batch, but as she's not working anymore, I have decided to do it myself this time. And obviously, the goal is to use an original medieval recipe...

...which poses a slight problem. Not because there are no recipes, no - quite the opposite. There are quite a lot, and though they are similar in regard to the ingredients, the details - and the amounts of the main ingredients that are given - can vary quite a lot. Some of them mention that one should be able to tell, from experience, how much exactly of one of the ingredients should go in.

Yeah. Only problem is that if you have no experience... well, you get the picture.

My search for recipes (which I have collected, and I will soon just pick one and go with it), though, has also brought me across an interesting database project: Colour Context, a database on colour practice and knowledge. It features transcribed recipes from a number of (mainly late-medieval) sources - so if you are interested in medieval colour, or artwork, this may be of interest for you.
0
OKT.
26
0

What goes into a Workshop.

Since I've been talking about needing guinea pigs, I thought I might give you a little bit of background on the development of my workshops in general.

I love giving workshops, or courses, or lessons, or whatever you want to call it. I really enjoy being able to pass on knowledge - theoretical and practical - and see how people start to become friends with a new technique. No matter whether it's braiding, knitting, weaving, or any other craft, every single person has his or her own, personal pattern of movements, and preferences on how to do things, or handle elements and tools. It's always fascinating for me to see this unique, personal finger dance develop, and it makes one part of why I like teaching so much.

Just like with many other things, though, a lesson does not spring from nothing to full perfection - it needs an astounding lot of work and preparation to develop a workshop or course.

This starts with making a basic concept. What do I want to teach? Are the students adults or children? What do they want and expect from the course? How likely is it that they have previous experience with the technique? How long can I make the course, and how deep into the technique can we go?

Usually, I try to put a lot of information into each workshop, to make sure that everyone goes out with a good, solid understanding of the basics and the tools to develop this further. This means structuring the workshop carefully so that I can set a relatively high pace, while still allowing enough time to try out things and get a bit of practice.

Once the basic concept stands, it's on to test runs and thinking about logistics. I usually do several test runs of the course, working the course programme and babbling to myself. I'm also checking how long each step takes me (and then, obviously, extra time gets factored in for having several people doing this the first time ever), and trying to find the best sequence of tasks. For some workshops, I've also done "live test runs" with a few willing people, testing out if things all work like they are supposed to do.

Logistics are another thing that needs consideration. How much space do I need per person? Table space and floor space can both be an issue depending on the venue. How many tools do I need? What are the materials necessary? How much extras need to be available in case of calamities? Will participants want to bring (maybe to test) their own tools as well?

Keeping in mind that there are several persons who need to do something at the same time, tool count can rack up quickly. One of the reasons why it took me so long to develop the tablet-weaving course range was that I had to bite the bullet and buy a freakishly large amount of clamps. To fit up to 8 people into the course, I need four clamps each for the warping method I use - and that means 32 clamps. These have to be bought (and it is worth it to get good quality ones, as they are gently but consistently abused), transported, and stored. Similar things are true for other crafts. I need to have enough netting needles for a course - these, at least, are lightweight and easy to store, though having them made is an investment as well. Sprang courses require having a frame available for each participant, plus some large demonstration frame to show the whole class the movements and what happens with the threads. These, too, need to be designed, made, paid for, and stored.

Once all this is done, I can sit down and write the final workshop script that will keep me on track while I'm teaching, and make sure I don't forget mentioning a crucial detail when it is necessary to do so (because these crucial details often get so ingrained if you have done the craft for a while that you are not aware of them anymore).

And then, finally, I can work on the course description and set the price. So if you've ever wondered what goes behind a workshop I give, and why I charge as much for it as I do - there you are.
0
JUNI
04
0

The Spinning Wheel!

Finally, all things necessary have come together: The wood that I need, the machines and tools that I need, and the lovely upstairs neighbour with time on his hands to show me how to use the machines. So on the weekend, I started work on the new wool wheel.

As German strategist von Moltke once said, "No battle plan survives contact with the enemy" - I have already made some changes to the plan that I drew in meticulous work. The board that will carry all the rest of the wheel has gotten somewhat slimmer (so that it could fit into the planing machine), and it's not all even (though that does not bother me a bit), and it's about 5 cm shorter than intended originally. But all that is no big deal, since the plan was more or less drawn after a Psalter illumination and part of the plan was to adjust as necessary.

In addition to the wheel, and in some way also to practice some of the procedures, I am also planning to build a crossbar-and-post tablet weaving "loom", which means a run to the hardware store today. And the loom will come in very, very handy for my latest weaving project which will also travel with me to the RGZM in two weeks. Fortunately, the thing is an utterly simple affair... rendered even simpler by my planning on how to build it.
0
MäRZ
11
0

I'm working on it.

If you want to know what "it" is today, it's both the Call for Papers/Call for Workshops for this year's Textile Forum as well as the tent for the market stall.

Writing the call for takes so long because, well, there are quite a few changes in comparison to last year, and we don't want to give a wrong impression by hastily written information.

And making the tent... well, everybody who has ever planned the construction of a tent/stall and then sewn that tent by hand knows how long that can take. Add to this the additional problems and challenges popping up - like the waterproofing issue - and it's no wonder that progress is slow. But it is there. After taking a nice, hot bath


the tent fabric is now completely dry again, and today it's time to test the construction basics by putting up the "framework". Most of the connections for putting up the wooden part will be temporary and provisional, since the tent structure has no stand-alone, rigid framework, but relies on combining wood and fabric. But I need to get a proper, hands-on evaluation of how large the inner space will feel in the completed tent, and I also need to mark where to put diverse bits and pieces for the construction on the fabric. So up it must go.
0
MäRZ
08
2

Make it proofed - waterproofed.

As spring is creeping in and battling hard with the remainders of the winter, the weather is getting nicer and nicer and season start is rushing towards us, I still have to finish my new market stall. It is coming along - yesterday was bathing day, and the main part of the tent - almost four metres on seven metres - took a hot bath in our tub.

Now that it is getting closer to being a tent, one of the biggest concerns (my German expression of choice would be "die größten Bauchschmerzen" - literally "the biggest stomach ache") is how to get it waterproof. Seriously waterproof.

We bought heavy linen fabric in the hopes of it being waterproof due to its nature - some heavy fabric, pure linen, can soak up water and then get so dense and tight that it can be even used as a bucket. Totally waterproof. Unfortunately, it became very clear very soon that our specimen of heavy linen fabric is not like that. Yes, it is heavy, but the fibres will not swell up enough when soaked in water to get it completely impermeable to water, and thus I need some additional waterproofing method.

And that's my problem. I want to have the tent/stall as accurate as possible, but I will draw a line at non-secure waterproofiness. I need my goods (and myself, but the goods for selling are more important here) to stay dry no matter how hard it rains. And I am willing to compromise if this needs some modern trick - though I would prefer a period way.

So there are some possibilities now that I have already found, among them using linseed oil varnish; using oil paint from linseed oil varnish with a pigment/filler mixed in to paint the tent much as an oil-cloth (with the added bonus of decorative possibilities); using store-bought waterproofing liquids; it would even be a possibility to buy silicone at the hardware store and "paint" the cloth with that. I'm still undecided, I would like to test each of the methods but I am shying away a little from buying all of those things for a small test scrap of fabric, and am generally feeling quite uneasy about this part of the project.
And I'd be very happy about any input that you might be able to give.
0
OKT.
20
0

Things happening

Quite a lot is going on behind the scenes here, not least of all the fact that we have started actual work on the new market stall. The first bit of cloth has been cut and now takes up space in our living room, lying around and looking innocent (as far as 30 square metres of cloth can look innocent, that is). Now we only need to sew one long line of about 7.5 metres before it's time to shrink and waterproof this part.
The wood is already in the basement (mostly - one bit is missing), and after the long piece we're at now is sewn together and treated, the wood structure can be inserted and the fixings made. But it will take a few more evenings of needlework until that is the case!

Another thing happening is my collecting of ideas for some more textile tools for the market stall. I'm thinking of more accessories and tools for goldwork and embroidery - so if you have any suggestions or wishes, let me know, and maybe I'll be inspired to include it.
0

Kontakt