Latest Comments

Beatrix Experiment!
23. April 2024
The video doesn´t work (at least for me). If I click on "activate" or the play-button it just disapp...
Katrin Spinning Speed Ponderings, Part I.
15. April 2024
As far as I know, some fabrics do get washed before they are sold, and some might not be. But I can'...
Kareina Spinning Speed Ponderings, Part I.
15. April 2024
I have seen you say few times that "no textile ever is finished before it's been wet and dried again...
Katrin How on earth did they do it?
27. März 2024
Ah, that's good to know! I might have a look around just out of curiosity. I've since learned that w...
Heather Athebyne How on earth did they do it?
25. März 2024
...though not entirely easy. I've been able to get my hands on a few strands over the years for Geor...
APR.
06
5

Easter Cake.

I hope you had a nice long holiday weekend - here it was wonderful weather on Saturday and Sunday, and quite cool on Monday. Then it actually started snowing on Monday evening, and has been snowing on and off all day today. That's true and typical April weather!

Speaking of typical - one of the typical things for Easter in Germany is cake. Special, shapely cake. This year, I had the strong desire to follow this Easter... and this is what ours looked like:


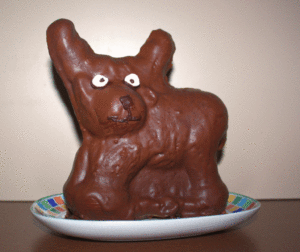
Admittedly, this is not the entirely traditional cake. That, of course, is in form of a sheep or an Easter bunny. You can either buy a special baking mould and bake them yourself, or buy a ready-baked sheep at about every single local bakery that exists. (The reason for the elk? I own neither a sheep- nor a bunny-shaped mould. My mom has a bunny... but in our household, there's only the elk, which we got as a wedding present and use far too rarely anyways. Also, if you cut off the antlers and eat them, it looks much more lamb-like already.)

And now I'm curious - do you have Easter cakes like that in your spot in the world? Or is that entirely unknown where you are?
0
MäRZ
22
1

Ginger Nuts.

It's been a while since I posted a recipe - time to change that!

It feels to me like there's been a bit more experimentation in the kitchen since the start of the pandemic, and there's definitely a few more recipes in my personal recipe book now. I try not to buy cookbooks or other printed cooking-related items, but I don't always manage to resist. Most recipes that I use, though, are adaptations of things I find on the Internet, where I look at a number of different recipes for one thing and then make up my own version.

In some cases, the adaptation is due to things not being available here. In this specific case, the things (Ginger Nuts) are not available to buy in German shops, and one of the ingredients, the molasses, are also not readily available. In addition, at least the cookies would be packaged in plastic foil, and since we're trying to avoid single-use plastics wherever at all possible, they'd be out anyways. (We solved the coffee problem, the Röstorium does not only sell wonderful coffee, but also posts it in paper packaging on request. We mostly solved the meat problem, finding a regional farm shop that even packaged things for us in their own reuseable boxes and lending them to us. Fish still is unsolved, and will probably stay thusly, unfortunately.)

So... here's my recipe for ginger nuts, which turn out hot and fiery and crunchy, and taste just like I remember the bought ones from Britain and Ireland, only maybe even better.


100 g flour (I use spelt)
1 level tsp baking soda
2 level tsp baking powder
40 g sugar
7 g ground ginger
pinch of salt
50 g honeydew honey (original calls for molasses)
50 g butter
a bit of finely grated orange peel (of c half a fruit)

Melt butter and stir together with honey, warming it until all is nice and liquid. Stir together remaining ingredients, then stir the liquids into the dry mixture. Divide into 16 parts, form each part into a ball, flatten slightly, and bake at c 190° C no fan for about 10-13 minutes. Take care not to let them turn brown.

These will be quite spicy, so maybe go down a bit on the ginger if you like them more mild!
0
FEB.
18
2

Savoy Cabbage.

I like cabbage. As we're trying to eat regional and seasonal food, that is a good thing, for winter in Germany means that quite a few different kinds of cabbage are available. The usual white cabbage, of course, which can also be nicely turned into Sauerkraut; brussels  sprouts, which some people just hate (I love them), and many more.

One of my favourite cabbage side dishes, typical in Franconia, is Wirsing - Savoy Cabbage. Though it's pronounced a little differently hereabouts... more like "Wähschingg". Anyway, just in case you're interested, here's how I do it:

Remove dodgy leaves from the outside of the head; cut into quarters and remove the core, then cut into stripes. (Sometimes a recipe tells you to remove the thicker stems of the leaves - I don't bother. You'll find out why in a bit.) Place into a large enough bowl, pour boiling water over, let sit for 2-3 minutes, then stir it a bit before transferring the cabbage to a clean pot. (This will allegedly make the cabbage easier to digest. I mostly do it because it's a quick and convenient way to get rid of any dirt that may have been hiding between the leaves.) Add salt and some water to the pot with the cabbage, bring to a boil and let it boil for at least half an hour - better if for an hour. The cabbage should be all soft. Make sure it does not run out of water while boiling.

Now it's time to turn it into mush. If there's a lot of liquid still in the pot, you might want to drain some. I use a stick blender to get a thick sludge. It should be firm and fairly dry, because now we add more salt if necessary, a bit of pepper, a dash of nutmeg and a generous dash of cream. If the cabbage is fairly runny after pureeing, you can let it boil a bit more on low heat to remove some of the liquid. Add more cream, water, or milk if it's too dry.


It looks like unspectacular pastel-green sludge - but oh, it's delicious!

Serve hot and enjoy - this is a wonderful side for fried sausages or roasts of all kinds, including roasted duck or goose. Dumplings or potatoes would be the typical second side dish for these.
0
JAN.
26
4

Catching Up. And Blue Potato Salad.

I'm currently catching up on paperwork and - lo and behold! - doing some research reading as well. That feels good, both of it! I often feel like I'm not getting enough research time in, but there's always so much mundane stuff to do... like filing taxes (which is a large part of the current paperwork stuff). Or getting the car fixed up so it can pass its prescribed biannual check... sigh.

On the sort-of-plus side, at least the weather is properly wintery, with snow falling and snow lying on the ground outside. And because that makes everything outside white, which is nice, but not very colourful, which would be a good thing in this rather grey and cold time of the year... we had blue potato salad today.


That's the Bavarian/Franconian version of potato salad, seasoned with oil and vinegar, no mayonnaise added. Germany actually has a cultural divide between the mayonnaise potato salad areas and the oil-and-vinegar potato salad areas, and a lot of people have a very firm opinion about which kind (their kind, obviously!) is the One and Only kind, and the other just weird or even awful.

Now... I grew up in Franconia, but my gran comes from mayonnaise country, so the potato salad of my childhood was not the typical local one. Consequently, I like them both, with a pronounced preference for the kind that my gran makes, because, duh. That said, I have had wonderful potato salad specimens of both kinds, and have tasted examples of both kinds gone wrong (as in edible, but definitely not tasty).

The blue one in the picture is not my gran's version, because that involves making mayonnaise (or buying it, but it needs so little that I prefer making just a small amount), boiling eggs, and having both the eggs and all the potatoes cool down completely before final assembly. For weekday lunches, this takes too much time (and/or too much planning ahead). This oil-and-vinegar version can be prepared hot and served warm to lukewarm, and thus is easier to fit within my usual one-hour-for-cooking time-slot.

It consists of diced onion, on which you pour a bit of hot broth (or hot water and then add some broth powder) so they mellow out a little; a bit of smoked bacon (the German kind can be eaten uncooked; if you can't get that, you can always fry your bacon cubes and add them afterwards); a dash of the liquid that your pickled cucumbers swim in; some of said pickled cucumbers. Add the hot boiled, peeled, sliced potatoes, which will soak up the liquids; then add salt, pepper, fresh parsley (if you have), more vinegar or pickle liquid, and oil to taste.

Proportions are entirely up to you - I like quite a bit of onion and cucumber in the salad, so I will use about a medium-sized onion and at least two large pickled cucumbers for the two-person salad (which is about 500 g of potatoes, and usually is not consumed completely in one go).
0
JAN.
20
2

The Deliciousness of Lactic Acid.

Something that has been tickling my "oooh, I'd like to try that"-fancy for years now is making my own Sauerkraut. Not that it's not possible to buy that stuff here, in good quality too (and in all kinds of packaging: plastic bags from the regional farm stores, plastic sachets, cans, and glass jars in the supermarket, and in different sizes as well), but there's a temptation towards making your own somehow. At least for me. Added benefit: Even though Sauerkraut can be bought in different amounts, it's usually either too little or too much for the two of us.

Also. Fermenting. The wonder of bacteria doing their thing, and of good stuff going different and somehow even better than before. Fermenting food is a very old method of making things keep, and some kind of fermenting procedure, for a variety of foodstuff, can be found in most cultures. Germany is probably most famous for its Sauerkraut - cabbage, usually white cabbage, fermented and thus soured.

All you need for making Sauerkraut is cabbage and salt - that's it. And maybe a little bit of water. Key for success here is that the fermenting stuff is always and completely submerged under its juice, which has salt added to it (0.5-3 % of prepared cabbage weight is the spectrum that I found); otherwise there can be mould growth.

I tried fermenting green beans in a glass jar a few years ago (which went middling well) and also tried to make salt lemons (essentially the same thing - put lemons and salt in a jar and wait for fermentation), which went horribly wrong. For Sauerkraut, though, I felt like it would be smart to use a special fermentation crock - because, well, making just a tiny glass jar of the stuff didn't really feel like the thing to do, and from my previous two tries at fermenting things, I was pretty sure it would be easier with a larger amount in a proper vessel.

A short time before Christmas, I finally managed to get my hands on a proper pot... through our town's special small ads board. Said board, called "Verschenkbörse" (give-away-market, more or less) is mostly used to list things that you don't need anymore, but that are too good to throw away. You list them and either say you give them away for free, or ask for something else in exchange - the one rule is strictly goods only, no vouchers and no money as exchange goods. It's also possible to do a "in search of" ad, which is what I did - and ended up with a 20 l fermentation pot (which is quite large, yes, and a 10 l one would have been fine too, but it's no problem leaving space in a large one).

Little more than a week ago, we raided the market for a few kilograms of cabbage, and an evening was spent shredding, kneading, and pressing everything into the container. So far, it's going well - a first taste test has already proven the contents to be quite delicious, and in a few more weeks, it will be all ready.

[caption id="attachment_5761" align="alignnone" width="854"] 
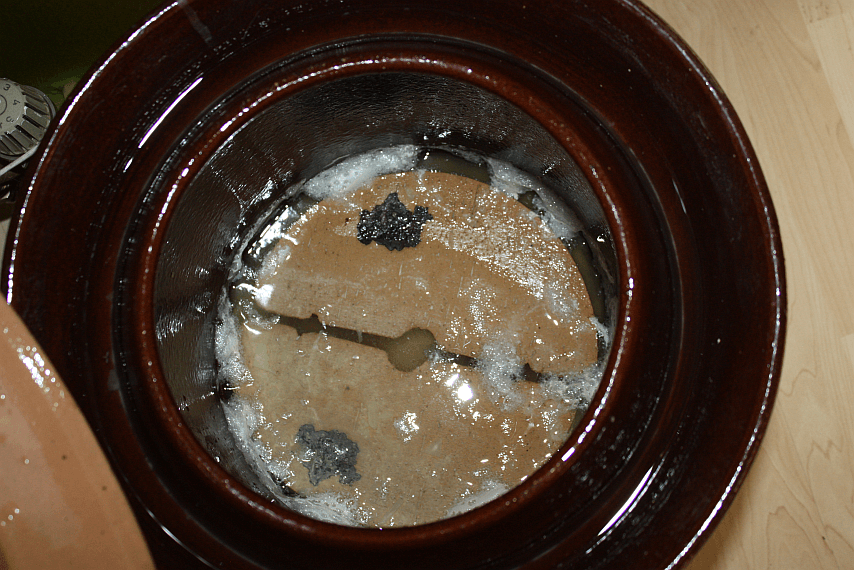
A glimpse into the pot - two weights come with these kinds of fermentation vats, to keep all things nicely pressed down under the surface of the liquid. You can see some foam (that is normal); the black spots are discolorations of the weights. Unfortunately it's not possible to photograph the pleasantly acidic scent!


I'm already looking forward to wonderful Sauerkraut...
0
DEZ.
09
0

Baking Hacks.

I'm slowly running out of new seasonal cookie recipes to post... which is not really a surprise, since I'm making mostly the same types of cookies each year, with only a little new stuff thrown in, and I've been posting recipes for a while now.

So this year, I'll just share a few general "baking life hacks" that you will hopefully find useful!
  • Silicon baking sheets. I have four of these, and using them has brought down cookie breakage from significant to about zero for me. Even now that I have newer non-stick baking sheets, I still use them. Additional benefit: The silicone sheet can be placed on the counter and filled with cookies, then you carefully pull the sheet onto the baking sheet or the grid.
    I also use the sheets if a recipe tells me to roll dough out between layers of clingfilm, or other single-use plastic sheets, as I refuse to use single-use plastics for that (and have done so for years, even before the most recent quest to ban more plastics from our life). If you do that, and it gets harder to roll it out, it helps to remove the sheet from time to time, so the dough can spread again.
  • Peeling almonds. Some of my recipes call for peeled/blanched almonds. I've always bought the whole things and done any grinding myself, and that means peeling also has to be done. Usually, instructions tell you to pour boiling water over the almonds, wait a bit and then pull off the skins. I've often struggled with that... until one day, I forgot to peel them right away and the water had gone too cool. So I poured off the cold water then poured fresh boiling water over them again. They were amazingly easy to peel afterwards! I've done it similarly ever since: Steep in boiling water for a few minutes, pour off the water, add fresh boiling water, wait a little, then peel while still hot.
  • Grinding nuts - I've always used an old-fashioned grinding thingie, which would yield medium-sized to rather coarse bits. I've recently discovered the trick to get the finely ground nuts or almonds, like those you can buy ready-made: Use a meat grinder with a fine disc.
  • While we're talking of chopping up things, another new discovery for me: A food processor can be used to help prepare cookie dough. I've found out about that trick on American recipe sites. Fill flour, cold butter cut into thin slices, and possibly some or all of the sugar into the food processor and blitz until the butter has been transformed into small bits, covered by the flour. Then tip onto the table, add eggs and other ingredients as called for by your recipe, and knead together. This saves the cutting and crumbling up stage to mix the butter and the flour together.
  • Choose cookie cutters wisely. For years, we bought a new cutter every advent, because... well, no real reason needed, right? (Actually, it was just a nice little thing to buy at a Christmas market.) However, the cutters had to pass the test - in the shop or at the market stall, we'd take several of the same cutter and try to stack them together as closely as possible. If their forms meant large spaces between the individual cutters, they'd stay right where they were. Cookie cutters with a form that will fit itself well means little space between cookies, and thus little leftover dough after each run, and thus better dough quality until the end (because you don't have to roll it out again so often, and that means less flour uptake).
  • Speaking of rolling out and flour uptake: I roll my dough out on a clean cotton tea towel that gets lightly sprinkled with flour. Due to some reason, that constellation means less flour is needed. For the basic cookies that I make and that get rolled out thinly, there's the additional thickness control built in: They are thin enough when the checkered-pattern stripes of the towel start to be visible through the sheet of dough.
  • Four times is about the limit of how often I roll out pastry dough. Initially, I divide the dough into pieces of suitable size for rolling out. Leftovers from the first goes are collected, all kneaded together and rolled out again. After that, depending on how much dough is left, it gets rolled out either once or twice more. At the stage where there is only a small circle of dough after rolling out, a few cookies are cut from the sheet with plenty of space inbetween, and the rest baked as it is (or maybe cut with a knife into handle-able parts). That will get you an ugly cookie or more, which are just as tasty as the nicely-shaped ones, and include the perfect excuse to eat them whenever you wish. Because obviously, ugly cookies cannot be served to others, right?
  • I use the butter wrapping papers to grease sheets and forms. Once the butter has been unpacked, I fold them once or twice and stick them into the freezer compartment of our fridge. When something needs to be greased, I take one out, let it thaw for a few seconds, unfold it and rub the something with the buttery side. No greasy fingers, quick, easy, and no waste of the butter film always clinging to the wrapper no matter what.
  • Leftovers after decorating? For my reindeer cookies, I make a glaze from orange juice and confectioner's sugar, plus very finely ground off orange peel. The latter is the secret to having a proper, strong enough orange taste to the glaze. Anything left of that after glazing the proper cookies goes onto the ugly cookies, making them even tastier.
    Leftover chocolate from covering cookies, or other things? This can be mixed up with cornflakes to make choco crossies, chopped nuts to make nut clusters, or crumbled up cookies can be mixed in. Be creative. Bonus: The outcome can probably be classified as "ugly".
  • For quite liquid glazes like the orange sugar glaze, I use a brush. For everything else that needs to be applied to a surface, such as jam or molten chocolate, I use a pastry fork - for me, that works much better and is less messy than a brush. The fork is also very convenient to stirring up the jam to make it smooth enough for application. I've tried heating it up once, but that seemed to make only a very small difference, if one at all, in the end product, so I've gone back to using the cold jam, stirring it up and applying it.
Happy baking, I hope you find something useful among these tricks!

If you're looking for proper recipes for baking, the seasonal recipes that I blogged in the past are:
1
OKT.
13
2

Oat Cookies.

I like oat, and I like cookies, and consequently I also like oat cookies. There's the kind that you can buy at IKEA, for instance - flat and crunchy and oaty and... sweet. Very, very sweet.

I've had a bit of a fancy for oat biscuits for a while recently, but wasn't willing to buy them, because of a) their overboarding sweetness and b) plastic packaging. Then came an opportunity to bake some... so I did what I usually do when something like this comes up. I trawl the Biggest Of All Cookbooks (aka the internet), pick out about a gazillion of recipes, look at all of them and then I either mash up between two and five of them, or I take one and modify it according to my whim. Sometimes both. (In very extreme cases, the recipe that I pick gets slaughtered so completely that there's not too much over of the original... but hey, it's just guidelines anyways, right?)

In this case, I stuck with the typical modification that I make when getting baking recipes off the 'net, which is reducing the sugar contents. I might also adjust butter quantities, and I always substitute butter if the recipe calls for margarine or shortening; I also use spelt flour instead of wheat as a standard mod. That's a leftover habit from the time when I had trouble digesting wheat; fortunately, that is not the case anymore, but I've just stuck with using spelt as my standard flour. No point in overdoing it with the wheat consumption and tempting fate! This time, the original recipe called for spelt already, so no switch needed.

The cookies were supposed to go all puddle-y in the oven, as in "melt into flat thin shapes" and then crisp up. Mine didn't, which may be due to the slight modifications I made - possibly they'd do that more if the oven temperature is a little lower, and they are instead baked for longer, but the dome shapes were nice, too. I pressed them a bit flatter once I realised they would not flatten themselves, which let them turn out a bit crunchier.

So, here you go - my recipe for sweet, but not overly sweet, oat cookies:

100 g butter
100 g rolled oats
60 g brown sugar
30 g honey
1 tsp vanilla sugar
1/2 tsp cinnamon, ground
120 g wholegrain spelt flour
1 tsp baking powder
1/2 tsp salt
45 g almond flakes (optional: roast these in a dry pan)
60 ml milk

Melt butter and let it cool a bit again. Mix butter, sugar and honey together. Mix dry ingredients in a separate bowl, then stir in the butter mixture; this will form a crumbly mass. Now add the milk to form a sticky dough.

With wet hands, form c. 36 small balls and place them on baking sheets. Leave enough space between cookie balls so they won't run together (in case they do run, which mine didn't). Bake for about 10-15 mins at 180°C, no fan. (Maybe try 160° and see if they will go flatter.)

Once cool, store in an airtight container if you like to keep them crisp.

Enjoy!
0

Kontakt