Latest Comments

Beatrix Experiment!
23. April 2024
The video doesn´t work (at least for me). If I click on "activate" or the play-button it just disapp...
Katrin Spinning Speed Ponderings, Part I.
15. April 2024
As far as I know, some fabrics do get washed before they are sold, and some might not be. But I can'...
Kareina Spinning Speed Ponderings, Part I.
15. April 2024
I have seen you say few times that "no textile ever is finished before it's been wet and dried again...
Katrin How on earth did they do it?
27. März 2024
Ah, that's good to know! I might have a look around just out of curiosity. I've since learned that w...
Heather Athebyne How on earth did they do it?
25. März 2024
...though not entirely easy. I've been able to get my hands on a few strands over the years for Geor...

Subcategories from this category:

headwear
APR.
15
0

Livestream about the Lengberg Garment Reconstructions on Saturday!

Exciting news has reached me yesterday - on Saturday, April 17, there will be a live Q&A about the Lengberg garment reconstructions on Youtube, run by Marion McNealy, Rachel Case and Beatrix Nutz. I'm delighted that I heard about this in time!


So if you have no un-topple-able plans for Saturday evening, the livestream starts at 20:00 German time, and here is the link to the Youtube channel where it will take place.
0
SEP.
06
0

More about lace chapes.

I wrote a bit about my lace chapes project before the summer break already, but I think it's time for another bit of info on them. So for those of you in need to catch up: Lace chapes, historically speaking, were the equivalent of the aglet on shoe laces. They both protect the end of the lace against fraying and make it easier to thread the lace through a hole. When holding clothes together, such as doublet and hose, easy threading and un-threading is a very convenient thing.

Today, most of the lace chapes (or aglets, or aiglets, depending on who names them) that are sold as supplies for Living History are more or less cone-shaped, rather large (with a diameter of, usually, about 5 mm at the top), and often of a form more frequently found in the early modern age than in the Middle Ages. They are usually bought separately from the lace and then attached by sewing the lace to it through a pair of holes on the top. Here's a typical example, 26 mm long and 4.7 mm wide at the upper end, taken from the shop outfit4events.com:


The modern chapes you can buy always have a hole to attach them to the lace - obviously necessary, since they are sold empty.

Finds of medieval lace chapes sometimes have these holes, sometimes not. In the cases where there are holes, we often still have their original filling - which was not thread, but a rivet. Medieval chapes are also much smaller - often only 2 mm in diameter - and made from very thin material.

Since I've been asked time and again whether I could also offer "proper" medieval lace chapes, I finally got "Project Chapes" underway. I did some research, I asked some colleagues for info and good pictures (thank you again for your support, Beatrix and Gary!), I found a metalworker who said he'd be willing to make chapes. My plan was to have them made, then offer them both fitted to a lace and separately (with rivets to mount them the proper way), just like the other shops do.

Well. There's plans, and there is reality. The metalworker that I contacted was, basically, willing to make the chapes - but he would have to ask a much higher price than would be feasible for me to actually sell them on. Part of this was that when we did the tests together, we did not have the proper (very thin) brass sheet material, which did make a lot of a difference.

So in the end, I found the proper material, I sat down, and I did a few tests myself. With results that make me very happy, but - again - sort of shredded my plans...

Making lace chapes is like so many other craft tasks. If you have the proper materials, the proper tools, and you know which steps to do and how to do them, it is not a big deal. It took me a while to find out what I have to do to get proper results, and to get the tools together that will help me do the job. Especially the riveted versions are still rather fiddly, and I don't have all the proper materials, but I am getting there, slowly.

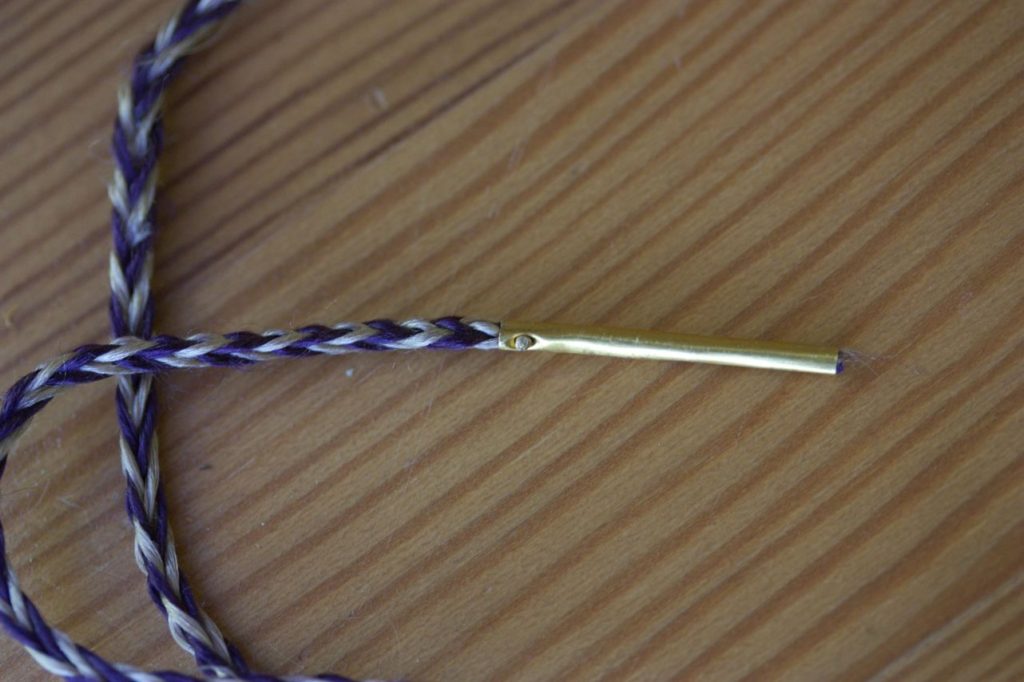
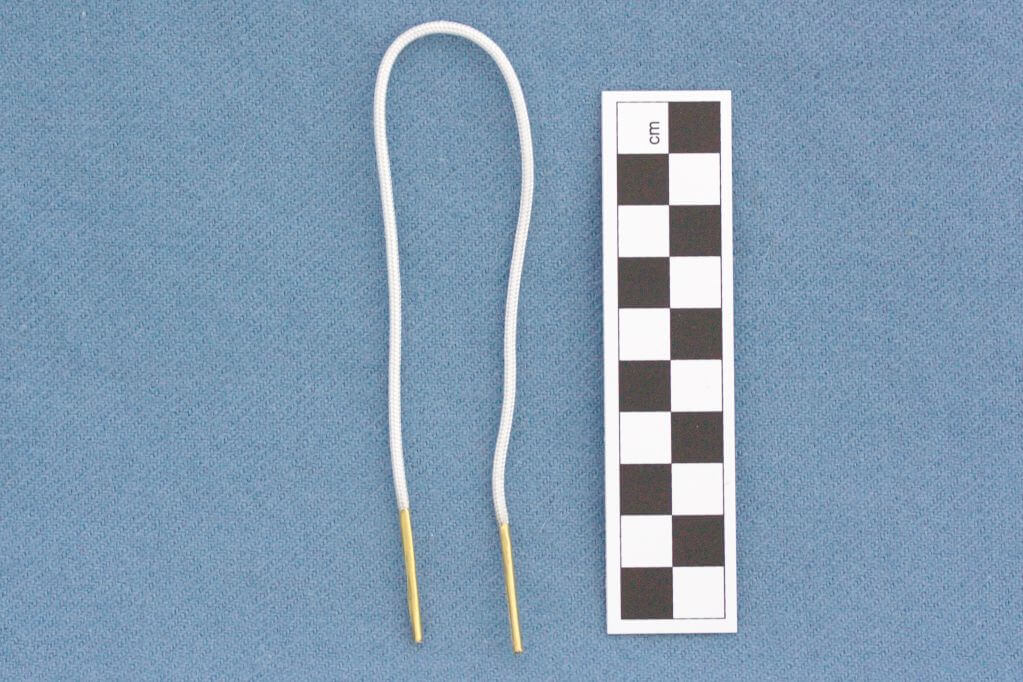
What I found out is this: You really don't need a lot of material, or thick sheet. The original chapes were often made from 0.1 mm thin brass sheeting, and that works wonderfully. The trick for making proper chapes, however, is that you have to work the chape directly onto the lace. There's no "making, then attaching" - it's both at the same time. Which also explains why in many cases, no rivets are needed; the chape is hammered around the lace so tightly that it will stay. In addition, the upper edge gets a slight faceting inwards at the end of the process, securing the chape even better. (It took me a good while, by the way, to fiddle out how best to do this faceting.)

[caption id="attachment_4804" align="alignnone" width="1023"] Chapes on a silk lace, braided, 26.5 cm length overall - that is the length from a find from London, and about exactly what you need to make the half-bow knot often seen on late medieval images that holds tunic and hose together.

This means, however, that I will not sell lace chapes on their own - because that would be useless. In theory, I could sell chapes with holes and accompanying rivets, but riveting these things is such an incredibly fiddly task that it would only result in disappointed, frustrated customers (and that would in turn disappoint and frustrate me). Also, getting the band into the empty metal sheet is hard, and the tighter the fit (which is what you want, the harder it is.

The way I see it from my trials now, if the lace in question is sturdy enough, it is sufficient to hammer the chape around the lace end, and be done. In cases where the lace is rather "untrustworthy", or when you want extra security, it's possible to add a rivet to the whole thing. I haven't got a real idea of when rivets were usually added yet, but I can definitely say that they are not always necessary, and that they are very, very fiddly to insert.

 
0
JUNI
28
2

Lace Chapes - Or: How To Tiny Metal.

I've been asked about proper, nice, authentic lace chapes again and again over the past years... so this has been on my list for ages now.

Lace chapes, for those of you not into medieval dress accessories, are like the plastic endcaps on shoelaces - they protect the lace from unraveling, and they make threading the lace through holes or eyelets much easier. Especially in the later Middle Ages, the style of dress for both women and men uses lots of laces to get things nice and tight-fitting on the body... and for all those laces, chapes are really handy.

The tiny problem is, though: The chapes you can usually buy today are way too large, and they are often cast, while the originals were made from sheet metal with use of a hammer and much smaller. How much smaller? Well. The modern ones I could find quickly when pretending to shop for some have a top diameter of about 5 mm. The medieval originals that I have nice documentation for have a top diameter of between 2 and 3 mm. That is... much smaller.

Most modern laces with chapes are also held together with a few stitches, while those original chapes that survived with lace in them are usually riveted to lock in the lace.

So recently, I have gotten some material to give this a try... then I played around some more. Then I bought some additional tools. Then I made some more tools. Fiddled around some more. Researched what was inside those chapes.

I'm getting there now. I can tell you, though: These things are tiny. TINY. And it's incredibly fiddly to set those infinitesitiny rivets without bashing the chape itself to pieces...


...but I'm getting there. This is one of the latest prototypes I've made, with 2 mm diameter at the top. And just so you get an idea of the size, here's a bigger one (with a good 3 mm diameter top) in my fingers:


I had originally planned to make these chapes and sell them, together with rivets, for customers to assemble with their band of choice. It looks to me, though, as if the originals were hammered close around the lace, then riveted for extra security. Even if you put this aside and assume it will be possible to stick enough of the lace into the closed chape, successfully setting a first rivet took me several tries, complete with totally bashed chapes. So I'll have to offer the chapes mounted on laces, all set and finished, to save everybody's nerves.

Which means I had to take a closer look at the laces involved...
0
NOV.
29
0

More Manesse, and barbette-and-fillet thoughts.

Yesterday's post brought up a question in the comments regarding whether the fillet with the pie-crust edge was closed on top or not... good question.

Personally, I tend to see all of the fillets as open on top unless I can clearly see otherwise. That is possibly due just to a personal quirk, but my reasoning is: You don't really need it closed on top for stability (stiff linen holds up just fine even without an inlay of leather, or felt, or whatnot), and it's easier to adjust in size if you don't close it. So you can have a strip of linen that you tack together or even just hold together with a needle in the back, and if your hair changes or your hairstyle changes or you have a thicker barbette... adjusting the size is no big deal. Also it saves material.

There is one non-typical fillet in the codex Manesse that shows, very clearly, a non-closed version:

(fol. 11v, or page 18)

I have also tended to see the little darker area on top of this fillet as the top of the head peeking through:

(fol. 32v)

The only closed headdress find I know is one from Villach-Judendorf; that one has, however, no pie crust and consists instead of gold-brocaded narrow ware. Beautiful - but quite different from the Manesse versions.

Finally, while there is no picture of b-and-f in the Manesse clearly showing the top of the head peeking through, there is also none clearly showing a fabric top. And there are quite a few pictures clearly showing the fillet as just a strip, such as this one:

(pic out of HÄGERMANN, D. (Ed.) (2001) Das Mittelalter. Die Welt der Bauern, Bürger, Ritter und Mönche., RM Buch und Medien.; late 13th c, England).


That's my thoughts about the question hat or band as fillet - I'd be happy to hear your opinion, and the reasons for your arriving there!
0
APR.
15
4

Do you know Sewer's Block?

Do you? No, I don't mean the nasty clump of crud clogging the pipes. I mean Sewer's Block as in Writer's Block - only with sewing work instead of writing.

I think there must be something like it - because yesterday, I finally overcame the hesitation to work on my dress (that has to be finished for Freienfels, because I want to wear it there). Since my upper body has changed a bit during the last two years (damn you, more-or-less-regular gym visits!), combined with shrinkage of cloth in some of the garments, some of my old dresses do not fit so well anymore. That means it's high time for another of St. Elizabeth's dresses to fit me, and I have a gorgeously teal-coloured fabric for that. So I was looking forward to making a teal-coloured dress for a while, until I finally found the time to sit down and start working on it. And then, halfway into cutting... which I have done time and again before, with no problem... I stopped working on it for a while. Procrastination Wave hit me.

Admittedly, it hit me together with a stack of more urgent things (because you know the effect that season start is always soooo far away, right? until it's just, all of a sudden, like, next week?) so it was not a blatant ignoring of the half-cut dress. Not totally, at least; the more urgent things really were more urgent. And since there was no actual pressure, as would be in a time-critical situation (like season starts tomorrow) or similar, I could just put it aside for a while. But after the embroidery workshop in Vienna and finishing the spinning project, I really ran out of reasons not to work on the dress just now.

So I sat down with it yesterday, I cut the second sleeve (that was already marked out) and set it in, I cut the sleeve gores and set those in, I tried it on, and everything is as it should be. And now I'm wondering why I didn't do this oh, weeks ago? More importantly, I'm wondering whether that only happens to me occasionally, or if there are others out there.
Sewer's Block, anyone? And what do you do to get over it?
0
DEZ.
10
4

The things you pick up.

YearsZM3 and years ago, at a small conference in Bamberg that a colleague of mine organised, I met with a few very interesting and very nice ladies. And with one of them, I somehow got to talking about buttons.

That was not so long after I had made a little hood with buttons after Textiles and Clothing, and I had made my buttons just like Crowfoot suggests: Cut a circle, pull it together by sewing along the edge, maybe stuff it with cloth and strengthen it by sewing through it in circles. That did work, but was somehow awkward, and it took quite a long time to do, and left the cut edges of the button quite exposed on the underside.

And Véronique Montembault then told me about a different method, one that she had reconstructed and now used for her cloth buttons: Cut a square of cloth, fold the corners in and fasten them with a few stitches; then fold the corners in again and fasten them; then fold the corners in again. The last fold-and-pull action tightens the button into a roundish shape; if there are still slight corners left, I stitch into them, pull the thread across the underside of the button and stitch into the next protruding bit. With soft fabric, it sometimes helps to make the button nice and firm to stuff a bit extra material into it before folding corners in the second time, but with firm fabric, just the square is enough. The cloth bits for this method are easy to cut out, do not waste fabric, make lovely little buttons in very little time, and all the cut edges of the fabric bits are hidden inside the button where they can't fray at all.

I did not use that knowledge about how to make buttons differently for years - but now I've made a heap of cloth buttons for the Hartenstein garments, and with every button, I felt really glad that I had been to that conference and met with somebody who gave me that little gem of knowledge (she demonstrated with a dark red paper napkin, by the way) that made my life so much easier now and button-making so enjoyable. And now I'm passing it on.

Cut a square out of your button-making fabric; try 3 cm side length for a smaller button, 4 cm for a large one. Thread a needle with thread, make a knot on the end of the thread and stitch through all four corners of the square, front to back, close to the edges and once more through the first corner; pull gently on the thread to bring them together. Now you can push them down onto the middle of the square. I now stitch a small circle around the middle of the now smaller square, to hold the corners down and strengthen the button top. Now stitch through the four new corners again (all four and the first one a second time) and pull together; this gives you a little pyramid shape, or something resembling a flower with four petals. I fix the middle by stitching just once through the button top and back.
Now the final fold. Like before, stitch through the four corners and the first on a second time. Try to squash the button into a rounded button-form with one hand and pull on the sewing thread with the other hand, making the button nice and tight. Stitch into all bits that stick out on the round and pull them together by criss-cross-stitching on the base of the button. When I'm content, I just stitch through the button to the button-top and back again once and then snip the thread.

And that's all there is to a folded button from a square bit of fabric. Enjoy!
0
JAN.
21
9

News about Netting!

A good while ago, I ran a series about medieval hairnets and netting, writing about my experiences and results from working netting both as a spiral and based on real rounds. And I wrote this:
I'd say that an unadorned, simple net might well be worked in a spiral, since it will take very hard looking to see that: In the crown section, there's too much thread on too small an area, and the lower end of the net, if stitched to a band or sporting longer loops for closure, will not be easy to read. For any net that will show different size mesh, colour changes or embroidered patterns, spirals are out of the game, because they are just irregular enough to show.
in that post back there.

For my suspicions about nets worked in true rounds because of colour changes, different-sized mesh and embroidery, I had a prime example in mind - rolling all those treats into one beautiful hairnet that I had already blogged about by that time - this hairnet:


I was, at that time, convinced that this so amazingly regular-looking hairnet must be made in rounds, not in a spiral.

Well.

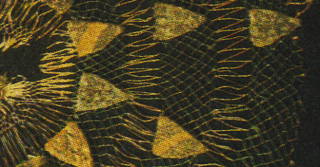
I stand corrected, and many thanks to Cynthia, who studied the net much closer than I did. And gave me a heads-up on my error. Proof that I'm wrong (and that looking at the evidence much more closely than I did in that case is always the right thing to do) was before all of our eyes all the time, because even on that blurry picture, you can see that it was netted as a continuous spiral - if you look at the bit at around 3 o'clock:


Can you see it?

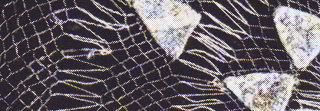
Maybe it's a bit clearer in this picture:


(This comes from HEINEMEYER, ELFRIEDE: "Zwei gotische Frauenhaarnetze." Waffen- und Kostümkunde 1 (1966): 13-22.) There's a jog right beside the upper edge of the little shield motif that is cut by the upper edge of the picture. The one without a partner by its side. And there might even be a single green thread going down from the last green bit to the next green bit, crossing right through the white bit. Which would be totally the thing to do if you couldn't be bothered to cut the green thread just for that little bit of white.

So much for netting in rounds... and I take back what I wrote, and now say:

While you might suspect that netting in the rounds would be more useful for nets with embroidery, different-sized mesh and colour changes, the busy overall pattern of such a net, made in fine threads, distracts the human eye enough from the slight irregularities of the jog that these are only seen when looking very hard or studying a net in detail.

(And now I'll wait for somebody else to prove me wrong again. Bring on your hairnet analysis results - I'm quite in the mood!)
0

Kontakt