")
")


I wrote a bit about my lace chapes project before the summer break already, but I think it's time for another bit of info on them. So for those of you in need to catch up: Lace chapes, historically speaking, were the equivalent of the aglet on shoe laces. They both protect the end of the lace against fraying and make it easier to thread the lace through a hole. When holding clothes together, such as doublet and hose, easy threading and un-threading is a very convenient thing.
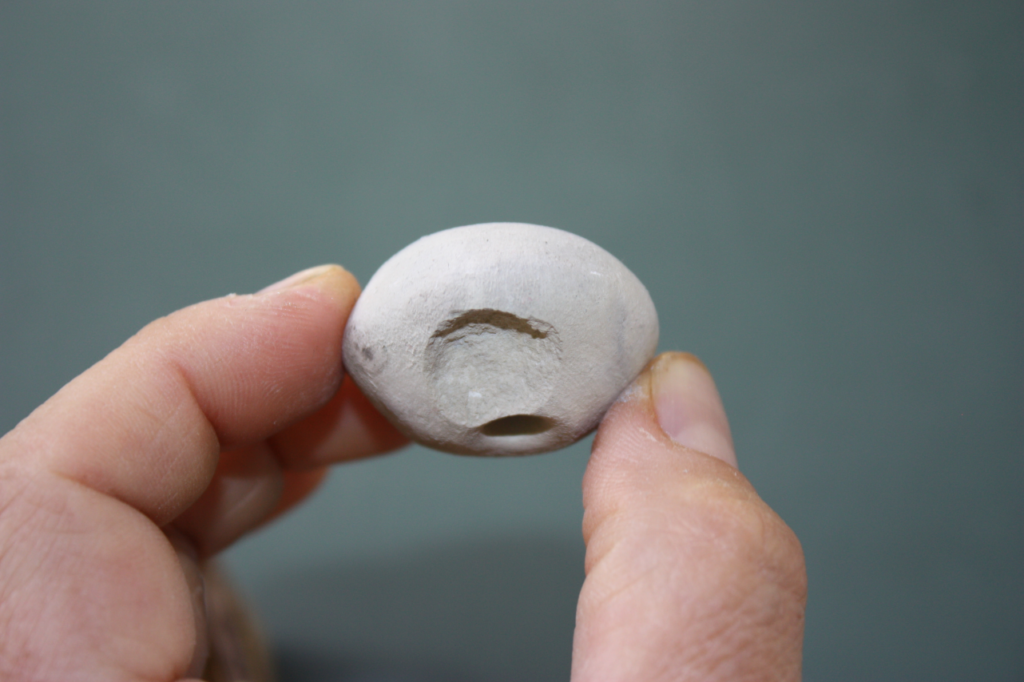
Today, most of the lace chapes (or aglets, or aiglets, depending on who names them) that are sold as supplies for Living History are more or less cone-shaped, rather large (with a diameter of, usually, about 5 mm at the top), and often of a form more frequently found in the early modern age than in the Middle Ages. They are usually bought separately from the lace and then attached by sewing the lace to it through a pair of holes on the top. Here's a typical example, 26 mm long and 4.7 mm wide at the upper end, taken from the shop outfit4events.com:

The modern chapes you can buy always have a hole to attach them to the lace - obviously necessary, since they are sold empty.
Finds of medieval lace chapes sometimes have these holes, sometimes not. In the cases where there are holes, we often still have their original filling - which was not thread, but a rivet. Medieval chapes are also much smaller - often only 2 mm in diameter - and made from very thin material.
Since I've been asked time and again whether I could also offer "proper" medieval lace chapes, I finally got "Project Chapes" underway. I did some research, I asked some colleagues for info and good pictures (thank you again for your support, Beatrix and Gary!), I found a metalworker who said he'd be willing to make chapes. My plan was to have them made, then offer them both fitted to a lace and separately (with rivets to mount them the proper way), just like the other shops do.
Well. There's plans, and there is reality. The metalworker that I contacted was, basically, willing to make the chapes - but he would have to ask a much higher price than would be feasible for me to actually sell them on. Part of this was that when we did the tests together, we did not have the proper (very thin) brass sheet material, which did make a lot of a difference.
So in the end, I found the proper material, I sat down, and I did a few tests myself. With results that make me very happy, but - again - sort of shredded my plans...
Making lace chapes is like so many other craft tasks. If you have the proper materials, the proper tools, and you know which steps to do and how to do them, it is not a big deal. It took me a while to find out what I have to do to get proper results, and to get the tools together that will help me do the job. Especially the riveted versions are still rather fiddly, and I don't have all the proper materials, but I am getting there, slowly.
What I found out is this: You really don't need a lot of material, or thick sheet. The original chapes were often made from 0.1 mm thin brass sheeting, and that works wonderfully. The trick for making proper chapes, however, is that you have to work the chape directly onto the lace. There's no "making, then attaching" - it's both at the same time. Which also explains why in many cases, no rivets are needed; the chape is hammered around the lace so tightly that it will stay. In addition, the upper edge gets a slight faceting inwards at the end of the process, securing the chape even better. (It took me a good while, by the way, to fiddle out how best to do this faceting.)
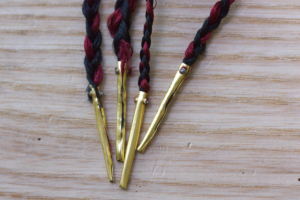
[caption id="attachment_4804" align="alignnone" width="1023"] Chapes on a silk lace, braided, 26.5 cm length overall - that is the length from a find from London, and about exactly what you need to make the half-bow knot often seen on late medieval images that holds tunic and hose together.
This means, however, that I will not sell lace chapes on their own - because that would be useless. In theory, I could sell chapes with holes and accompanying rivets, but riveting these things is such an incredibly fiddly task that it would only result in disappointed, frustrated customers (and that would in turn disappoint and frustrate me). Also, getting the band into the empty metal sheet is hard, and the tighter the fit (which is what you want, the harder it is.
The way I see it from my trials now, if the lace in question is sturdy enough, it is sufficient to hammer the chape around the lace end, and be done. In cases where the lace is rather "untrustworthy", or when you want extra security, it's possible to add a rivet to the whole thing. I haven't got a real idea of when rivets were usually added yet, but I can definitely say that they are not always necessary, and that they are very, very fiddly to insert.
Today, most of the lace chapes (or aglets, or aiglets, depending on who names them) that are sold as supplies for Living History are more or less cone-shaped, rather large (with a diameter of, usually, about 5 mm at the top), and often of a form more frequently found in the early modern age than in the Middle Ages. They are usually bought separately from the lace and then attached by sewing the lace to it through a pair of holes on the top. Here's a typical example, 26 mm long and 4.7 mm wide at the upper end, taken from the shop outfit4events.com:
The modern chapes you can buy always have a hole to attach them to the lace - obviously necessary, since they are sold empty.
Finds of medieval lace chapes sometimes have these holes, sometimes not. In the cases where there are holes, we often still have their original filling - which was not thread, but a rivet. Medieval chapes are also much smaller - often only 2 mm in diameter - and made from very thin material.
Since I've been asked time and again whether I could also offer "proper" medieval lace chapes, I finally got "Project Chapes" underway. I did some research, I asked some colleagues for info and good pictures (thank you again for your support, Beatrix and Gary!), I found a metalworker who said he'd be willing to make chapes. My plan was to have them made, then offer them both fitted to a lace and separately (with rivets to mount them the proper way), just like the other shops do.
Well. There's plans, and there is reality. The metalworker that I contacted was, basically, willing to make the chapes - but he would have to ask a much higher price than would be feasible for me to actually sell them on. Part of this was that when we did the tests together, we did not have the proper (very thin) brass sheet material, which did make a lot of a difference.
So in the end, I found the proper material, I sat down, and I did a few tests myself. With results that make me very happy, but - again - sort of shredded my plans...
Making lace chapes is like so many other craft tasks. If you have the proper materials, the proper tools, and you know which steps to do and how to do them, it is not a big deal. It took me a while to find out what I have to do to get proper results, and to get the tools together that will help me do the job. Especially the riveted versions are still rather fiddly, and I don't have all the proper materials, but I am getting there, slowly.
What I found out is this: You really don't need a lot of material, or thick sheet. The original chapes were often made from 0.1 mm thin brass sheeting, and that works wonderfully. The trick for making proper chapes, however, is that you have to work the chape directly onto the lace. There's no "making, then attaching" - it's both at the same time. Which also explains why in many cases, no rivets are needed; the chape is hammered around the lace so tightly that it will stay. In addition, the upper edge gets a slight faceting inwards at the end of the process, securing the chape even better. (It took me a good while, by the way, to fiddle out how best to do this faceting.)
[caption id="attachment_4804" align="alignnone" width="1023"]
Chapes on a silk lace, braided, 26.5 cm length overall - that is the length from a find from London, and about exactly what you need to make the half-bow knot often seen on late medieval images that holds tunic and hose together.This means, however, that I will not sell lace chapes on their own - because that would be useless. In theory, I could sell chapes with holes and accompanying rivets, but riveting these things is such an incredibly fiddly task that it would only result in disappointed, frustrated customers (and that would in turn disappoint and frustrate me). Also, getting the band into the empty metal sheet is hard, and the tighter the fit (which is what you want, the harder it is.
The way I see it from my trials now, if the lace in question is sturdy enough, it is sufficient to hammer the chape around the lace end, and be done. In cases where the lace is rather "untrustworthy", or when you want extra security, it's possible to add a rivet to the whole thing. I haven't got a real idea of when rivets were usually added yet, but I can definitely say that they are not always necessary, and that they are very, very fiddly to insert.