Latest Comments

Beatrix Experiment!
23. April 2024
The video doesn´t work (at least for me). If I click on "activate" or the play-button it just disapp...
Katrin Spinning Speed Ponderings, Part I.
15. April 2024
As far as I know, some fabrics do get washed before they are sold, and some might not be. But I can'...
Kareina Spinning Speed Ponderings, Part I.
15. April 2024
I have seen you say few times that "no textile ever is finished before it's been wet and dried again...
Katrin How on earth did they do it?
27. März 2024
Ah, that's good to know! I might have a look around just out of curiosity. I've since learned that w...
Heather Athebyne How on earth did they do it?
25. März 2024
...though not entirely easy. I've been able to get my hands on a few strands over the years for Geor...
FEB.
17
2

Hairnets, part I

I like hairnets. I also like making them - it is a nice thing to do with the hands, without much thinking. My nets, however, are a far cry from some of those medieval ones that are still extant.
A lot of people know the nets found in London - with mesh sizes between 3 and 9 mm, depending on the net. But they are really simple.

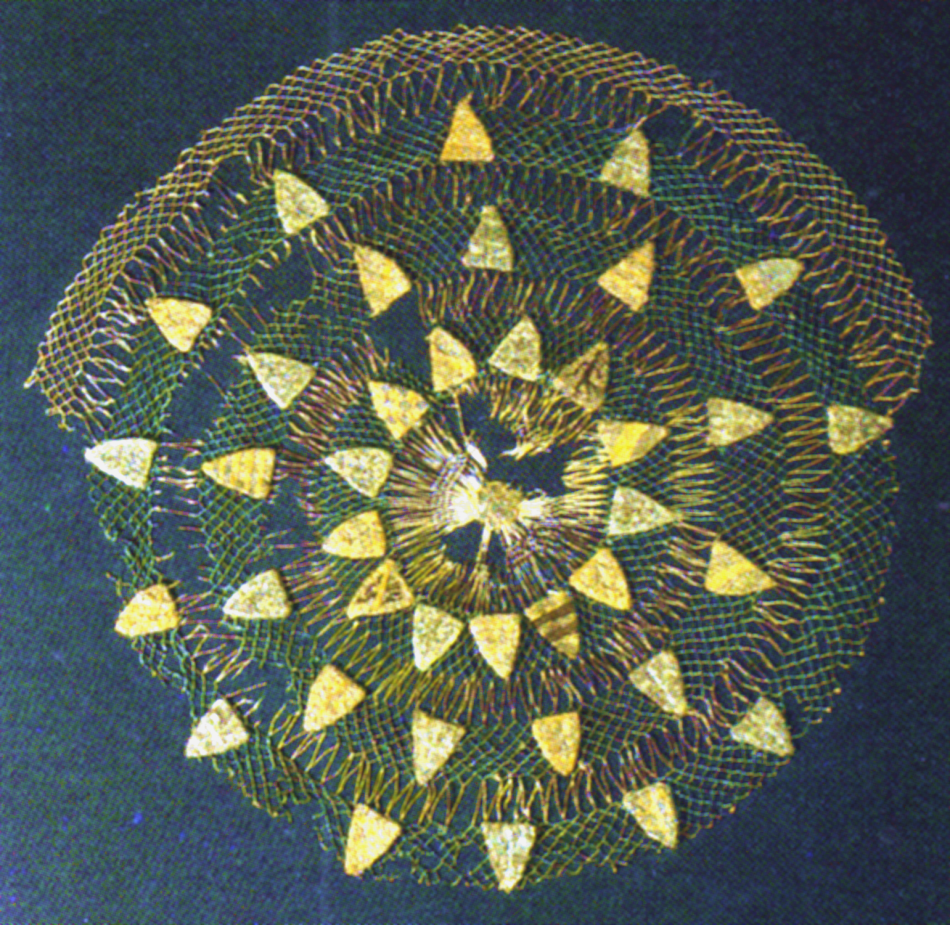
Now take this one, as one of the not-too-elaborate nets. We don't know where it comes from, unfortunately, since it was bought via art trade, but it has been dated to the last quarter of the 13th century. Nowadays, it is in the Art Museum in Düsseldorf.

(picture clickable for larger version)


Diameter is 33 cm, and it has been worked in green and white silk. I had to tune up the colours on the scan, and now it should be easy to see where the green and where the white silk was used. I would have expected the small, embroidered shields-with-arms on a white background. Shame on my modern mind - green it is. The arms are embroidered in spun silk and gilded silver wrapped around a textile core. The ground for embroidering was coarsely woven linen. Some of the arms have been identified: there's six times Sayn and eight times Geldern, pointing to the Middle or Lower Rhine region. The net might have served for a wedding or proposal ceremony. In addition to the 38 arms, there's a little six-petaled rosette in the middle of the net.

The netting should not be too hard to do, using two different-size gauges for the long white and the small green meshes. My rough estimate is 3-4 mm for the small green mesh and about 1.5 cm length for the long white mesh - which is "not very small" for green and "exceptionally large" for white. It would be very interesting to see it close up, and in good detail, to see whether it was worked in spirals or in rounds, and whether the colour thread not in use was cut off or just led down for the next colour change. Any odd joints caused by this could be covered up easily with the embroidery bits sewn on later.

Source for the net picture and information: FANSA, MAMOUN (Hrsg.): der sassen speyghel. Sachsenspiegel - Recht - Alltag. Beiträge und Katalog zur Ausstellung "Aus dem Leben gegriffen - Ein Rechtsbuch spiegelt seine Zeit". Bd. Beiheft 10, Band 2, Archäologische Mitteilungen aus Nordwestdeutschland. Oldenburg 1995.
0
FEB.
04
2

I'm plugging now. Shamelessly.

I have fulfilled a dream by continuing research after my master's degree at Uni Bamberg. And, of course, I chose medieval garments as my topic. It took me a while, but I am very happy with the outcome (and eternally grateful to my parents, who were incredibly helpful when any obstacles turned up).

I have since successfully finished and defended my phd thesis "Konstruktion und Nähtechnik mittelalterlicher weltlicher Kleidung" (Construction and sewing techniques of secular medieval garments) in Summer 2008. The thesis is a comprehensive survey of extant medieval garments with analysis of cutting, construction development and sewing techniques.

It is written in German with an English summary; you can get more information (in German too) about the volume and the topics covered on my website. I have already found a wonderful publisher for the book, and publication is being prepared. However, two obstacles are left to overcome: Get funding for the costs of the print run, and determining the right number of copies to print.

Since it will take at least eight months until the book can be released - a long wait for you and me - and it is very hard to evaluate how many people will be interested - a problem for the publishing house and me - I am offering subscription to a newsletter that will hopefully help us all (and me even twice):
I will be sending a short newsflash whenever a step in the publishing process is finished, keeping you up to date.
You will know at once when the book can be pre-ordered, which means no delay for you in getting the book delivered.

In return, having a number of seriously interested people on the newsletter list will help me negotiating with the publishing house and my editor and me in determining the number of copies to print. We are aiming for the price range 60-80 Euro for the book (hardcover with b/w illustration and coloured plates).

If you are interested in getting this book, please subscribe to my newsletter by sending an e-mail with the subject "subscribe" to Diese E-Mail-Adresse ist vor Spambots geschützt! Zur Anzeige muss JavaScript eingeschaltet sein..

And if you are not interested in the book, but know somebody who might be, you can do me a huge favor by telling them!
0
JAN.
21
10

Skjoldehamn neck flap

At last I found the time to check back to the lively discussion about the closure of the Skjoldehamn shirt on pearl's livejournal. The discussion already made another webmaster put up more and larger pictures, so it is high time I post my promised photo.

Here you have the neck flap, in colour, with the bead as closure and the broken loop of wool thread that probably served to hold the bead:


If I remember correctly, the bead is made from metal. Here's an even closer closeup, where you can see that it is not a leather thong, but a woolen braid or something similar that holds the bead to the flap.


And finally, in the last picture, you can see the upper left part of the flap, with the braiding running along the edge. The stripes can be seen clearly here.


I took the photos myself; please respect copyright rules when linking to or using them.
0
JAN.
19
3

Why sewing by hand?

HandsewnZM6 or machine sewn? For normal modern people, that is no question - a machine is faster and will almost guarantee you even, smooth stitches. When going into the living history field, things are different - machine sewn garments are then a sacrifice to modern style, to laziness, or to the fact that nobody has enough time for all those enticing projects and all the clothes needed. Or is that so?

When I started sewing for living history events, I was seventeen years old and had just gotten into the "medieval market" scene. My first piece was a hood - what else? It took me ages to stitch together the two halves of a hood (cut after a pattern drawing in a journal, not after an archaeological find). Even worse, the cloth was a mix of wool and polyester. But I had my first deep experience with hand-sewn clothing then, and I found that it really makes a difference.

Unlike modern patterns for clothing, medieval patterns are not designed with a sewing machine in mind. On the other hand, sewing technique is such an important thing in medieval tailoring that fabric, sewing thread and seam type were carefully matched together to get best results - this can be seen when comparing the extant medieval garments.

Choosing the right fabric for a pattern, and the right seamtypes for that fabric, is an essential part of historical tailoring and sewing. Which already answers part of the question that I hear regularly: Why do you sew by hand?

Historical patterns are not designed for sewing with a machine. Many stitches cannot be reproduced with a common household sewing machine at all (and not even a high-end one). In addition to that, hand stitches are much more versatile than machine stitches, and the beauty and functionality of good hand stitching are astonishing. On the Viborg Shirt*, up to eight layers of fabric are stitched together into a join that will lie absolutely flat - and this is even possible with thick, homewoven old linen. A hand-sewn seam will always look, fall and drape differently than a machine seam. And last but never least, it is much sturdier - as everyone who has ever picked a hand-seam apart will know.

Sewing by hand does of course take much longer than just running it through the machine. For an authentic presentation, however, handsewing is essential, and I can promise each hopeful beginner that he or she will have a wholly different attitude towards the hand-sewn garments, compared to something quickly machined together.

Here's a picture to whet your appetite for hand-sewn garments: It is one of my reproductions of St. Elisabeth's dress, sewn with linen thread from medium-thick wool twill. The hem is finished with a double row of running stitches and overcast stitching with inlaid wool yarn. Isn't this a nice thing to behold?


* There is a very thorough article on the shirt by Mytte Fentz, "En hørskjorte fra 1000-årenes Viborg" in KUML 1987; Årbog for Jysk Arkælogisk Selskab
0
JAN.
08
1

Connecting Textile Researchers

Things always come up in bunches - like when you are going to a flea market, and there are lots of stalls selling, say, pots? (Probably when you are not looking for a pot, that is.) And the next time, about everybody sells plates? Somehow, there seems to be something in the air that will instigate the same thing happening at several places.

With research, it seems to be the same thing. There are several things on the Skjoldehamn garments that have cropped up over the last years, and I have just realised that I'm way behind on this topic. Those garments are still extraordinary (there are only two proper trousers from the whole European middle ages that I know of, and one comes from Skjoldehamn), and I'm sure they will stay special forever. And I am very glad that they are getting re-evaluated and reconsidered, because they are absolutely worth it.

And now, connecting textile people seems to be in the air as well. I have received a very nice e-mail from Beth Matney with information about a duo of lists, started to help us all keeping up with the goings-on in the historical textile world:

As you know, it is a bit difficult to keep up with the literature, conferences, symposia, etc. in the field of textiles and clothing from the post-Roman through the early modern periods (500-1600CE). It is a field spanning many disciplines in many languages with the indexing of the journals quite scattered (if indexed at all) and many titles not well publicized or easily available. Well, in an informal discussion after a DISTAFF session at the last International Medieval Congress (Kalamazoo 2008) several of us (Dr. Carole Collier Frick, Dr. Gale Owen-Crocker, Robin Netherton and Beth Matney) bemoaned this and it was decided that an elist might be useful. So I have created two Medieval Textiles and Clothing groups:

A discussion list (restricted membership), MEDTC-DISCUSS: http://groups.yahoo.com/group/MEDTC-DISCUSS/

and a newsletter list for announcements of titles, etc. : MEDTC-RESOURCES: http://groups.yahoo.com/group/MEDTC-RESOURCES/

Though MEDTC-RESOURCES will include the titles and announcements from MEDTC-DISCUSS, it will not include any of the discussion of them and only in MEDTC-DISCUSS will you be able to post directly.These lists are academic in focus and scholarly in tone. Please see the full descriptions at the links above.
(Text Beth Matney)

So for all of you interested in historical textile stuff, maybe one of these lists would be a good idea!
0
DEZ.
18
1

St. Elisabeth questions

Teffania came up with questions on yesterday's post, and to avoid getting lost in comments, here are the answers.

So is this seam similar to the way some of the hose in the museum of London "textiles & clothing" book are constructed? (except the hose has running and overcast/whip stitch).
This method is near impossible to do by machine, but I've actually made a pair of hose with both sides in overcast stitch by mistake. I noticed that my fabric frayed less if my stitches were perpendicular to the seam on the cut side and diagonal on the other side. The opposite appears to be true of the stitching in your photo. (but then again, my fabric had more fabric than I'd prefer, and was on the very curved portions of the hose foot.
Yes, the hose in some of the London finds have the same seam in the foot parts, where it is most important to have flat seams.
Regarding the machine sewing, I would say it is absolutely impossible to do that seam on a machine, since you can't get proper overcast stitching. And I'm a handsewing advocate for medieval garments anyways, because you just get a different result. Especially when overcast seams come into play!

Anyway, while sewing this I found the easiest way to sew was to sew one side, then turn over and sew the other side. (Always sewing on the side with the cut edge visible).
Yes. Frankly I don't remember ever trying to sew from the other side, but since you don't see the edge, it would be incredibly hard and time-consuming. And medieval crafts may be time-consuming, but they are also very, very efficient.
My normal, don't think, do-them-fast overcast stitches are diagonal on the outside, and that's why they are diagonal on the gowns as well. And they are on the original. I don't know anyone who does perpendicular overcast as the standard (that would mean conducting the needle diagonally through the fabric, which is not the easiest way, especially when hem-stitching).

I notice in the photo that the stitches are prominent on the cut edge, but much less so for the other line of stitching. Do you think this is evidence for this garment being sewn this way? Did you get to see the other side of the garment? Did the seams look the same from the other side?
Yes, the stitches can only be seen on the outer side. I did not see the inner side of the garment, but on my hand-sewn gowns, you see one line of stitches on the outside and two lines of stitches on the inside. Why? Because it's so much faster.
I start sewing the outside line. When doing this, I have to align the two cut edges so I get an even overlapping, about 5 mm wide. This takes time (and sometimes nerves, when the overlap somehow sneaks away, and I have to re-sew a couple of centimeters).
Then I turn the half-finished garment around and sew the other side. Now I don't want the stitches from the inside to be visible on the outside, so it is actually a hem stitch and not a simple overcast stitch. Since doing the hem stitch means only catching one or two fabric threads instead of just ramming that needle through, this is also taking concentration.

Doing the seam that way means I have to concentrate only on the overlap while doing the outer edge, and only on the stitches while doing the inner edge. The other way around, I have one no-brainer (the outer edge) and one double-concentration-stint (the inner edge). And I'll still end up with a less-than-perfect outer seam, because even if you really really concentrate, there will be some wiggling of the second seam (because of that tendency of the overlap to sneak away).

This seam type doesn't seem as strong as some types to me - the edge is exposed to fraying, (unless it fulls a lot which I can't see in the photo) and the stitches can pull out by fraying the fabric. Are the high stress areas (eg armholes) constructed in the same way? How do these seams stand up to wear and tear in your recreations?
This very, very much depends on your fabric. And your sewing, of course. When I did my first copy, I did not know much about these seam types. I had an unfulled fabric, and I made very large, very wide-spaced stitches.
Seeing the original dress was an eye-opener for me. These stitches are tiny, and they are very closely spaced. I tried that version, and to my surprise, there is no fraying.
I would say that putting stitches in closely protects the cut edge, so it can't fray (or at least not much). Because it can't fray and more importantly, because you have overcast both edges onto the fabric of the counterpart panel, there is no stress on the cut edge. It is somehow hard to grasp for the modern mind, but it really works. You need to have closely spaced small stitches however, or there are not enough "anchor points" for the seam on the inside of the dress (only hem stitches, remember?).
The seams stand wear and tear with no problem. There are one or two places at one of the dresses where a few threads have moved away from the cut edge, but only a centimeter or so in length. There is a lot of fulling in the underarm region, but the seams are stronger than you'd think.

Finally, if the garment has some badly reconstructed bits, how many seams are original?
The seams attaching the sleeve to the body, the seams on the sleeve side of the body. The shoulder seams. Those running diagonally across the body were probably put in to compact the dress after lots had been cut away, and my guess is that these parts are remnants of the gores from the left side of the garment.

I hope this was helpful!
0
DEZ.
17
3

Medieval Togs - St. Elisabeth's dress

I got linked to - pearl over at Livejournal put in a link on my homepage in connection with the so-called penance dress of St. Elizabeth from Thuringia. She also gave one of my articles (a very early one, I'm afraid that can be told from reading it) as a reference.
I am certainly very happy about getting referred to and cited - but alas, the article she mentions in her LJ post is written in German, and I'm feeling a bit sheepish because of that.

When writing my thesis, I realised that while writing archaeological papers in the language of the home country is easy on the author, it can be very hard on the reader - especially if he or she has not learned the language in school. I since decided to write more in English, and I'm feeling even more sheepish when I have to admit that I don't always manage. I do try, though, and I promise to continue trying in the future. (Before somebody asks and I have to introduce a third degree of sheepishness, due to technical reasons, my thesis is also in German. But once it is up and running as book version, I will try to get it translated and published in English. Promise.)

Well, back to what I wanted to post about: St. Elisabeth's "penance dress". This 13th century dress was preserved as a relic and can be found in a small church, St. Martin in Oberwalluf. It is a brown dress today and was brown in Elisabeth's time. I have not found out why it was called a "penance dress", and I think this name is mostly based on the brown colour and perhaps some misunderstanding of medieval garment cut. The fabric is an evenly woven, good quality twill that was napped on the inside. The piece survived as a relic, which explains why so much of the dress is missing today in spite of the wonderful preservation of the fabric: It was cut away and gifted. Typically, such gifts might go to pilgrims, important church members and into new altars, which need a relic for consecration. (That is why catholic altars always are consecrated to one saint, and usually the church is named for the main altar's saint.) One sleeve is missing completely together with a large bit of the breast area, and only half of the other sleeve is still there. The hemline is lost too. The gown today is lined with linen, and most of the cut edges are secured with brown linen bands.

One of my favourite aspects of this gown is the sewing technique. I first found this special seam type on Elisabeth's gown, and I nicknamed it "Elizabeth seam". The two cut edges of the garment pieces that are joined together are overlapping for about 5 mm. Then both edges are sewn down on to the other fabric piece, using overcast stitches. This gives a flat seam, uses very little extra material (much less than a regular seam) and looks nice as well. On the original gown, the overcast stitches on the left (inner) side of the garment are not stitched through, so only one line of stitching can be seen from the outside. The seams are worked with fine linen thread and in very fine stitches, and very evenly, too. You can see how fine and even the seams are in this picture, and you can get an impression of the fabric quality as well:


When I was in Oberwalluf to have a look at the original, I had brought one of my "copies" to show, as a thank-you for letting me in. The gentleman who opened church and shrine doors for me (you can see the little blue key on the edge of one of the doors) also took a photo of me in my gown, in front of the original:

The original dress and a reproduction worn by me
St. Elisabeth's dress is the one garment that I have reproduced most often during the last few years - not only because 2008 was "her" year. It is also the garment that taught me about the importance of details in medieval tailoring, about form-fitting clothes that don't look the part when hung on a clothes-hanger, and about choosing your fabric and sewing thread to match (but not necessarily in colour). In short, it has taught me how to think of medieval tailoring - and that is only one of the reasons I will always love this dress.
0

Kontakt