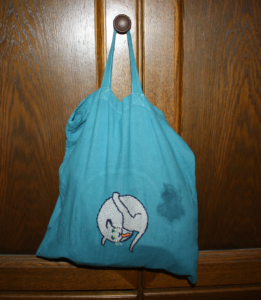
I just realised that I haven't posted a picture of the finished "visible mending" cat embroidery yet - so high time to remedy that lapse!
Here's the cat, in all its butt-licking glory, on the bag:
You can see that the bag has had better days, and the stain is still quite visible. There's also another small hole close to one of the side seams, and I'll eventually close that up with a few stitches. (Or, who knows, maybe with a tiny mouse?)
I'm quite happy with the bag and the cat overall, and it certainly was a lot of fun to do!
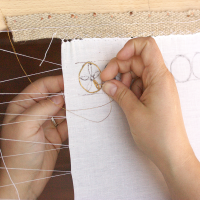
Progress has been made! There was some embroidering in the evening, and during weekend free time, so here's some more proof:
As you can see, I've opted for the Bayeux kind of couched work - long stitches covering the ground, then long stitches across those, and the latter stitched down to hold everything in place. It was nice and quick to work, and I really enjoyed it.
It's far from perfect, but then, it's just some fancy mending after all!
And for those of you interested in that kind of thing, here's the back of the cat:
You can still see where the original hole was if you look closely!
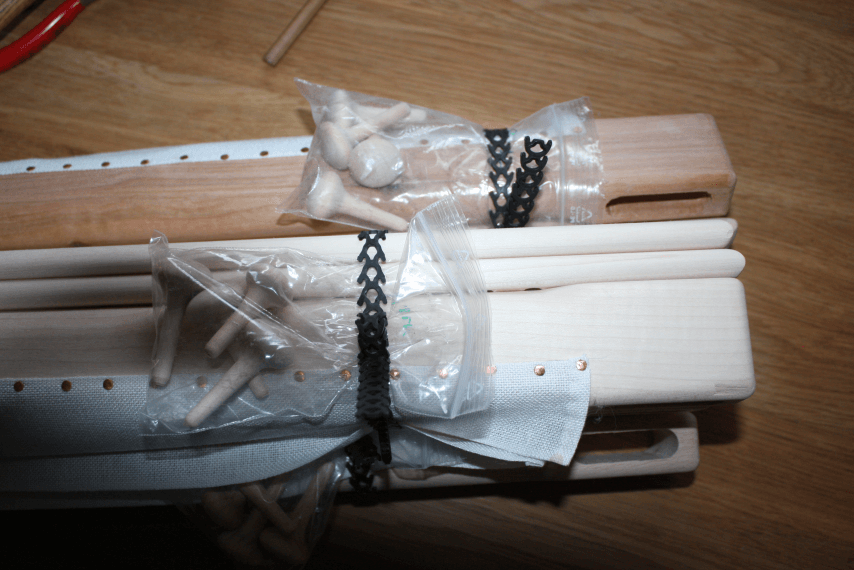
Here are a few images from the workspace, so to say - I've been outfitting part of the new embroidery frames with bands to attach the fabric.
The way these frames work is rather simple: You baste or herring-bone-stitch your embroidery ground fabric to the bands at top and bottom of the frame. Then you tension the fabric between the frame bars with help of the wooden pegs; if your fabric is a long strip, you can roll it around one of the frame bars to store the excess. (The bars are fairly rounded to avoid sharp crimps in the fabric or, as you progress, in the embroidered fabric.)
Once your vertical tension is thus established, you get a nice horizontal tension by stitching the left and right edges to the vertical slates. Using a needle, you pierce the fabric, then wind your tensioning thread around the slate, then go through the fabric again.
This setup of the fabric is, obviously, more time-consuming than just plopping a modern round embroidery frame onto a piece of fabric, but it will give you a higher, more controlled tension that will not slack off quickly or easily.
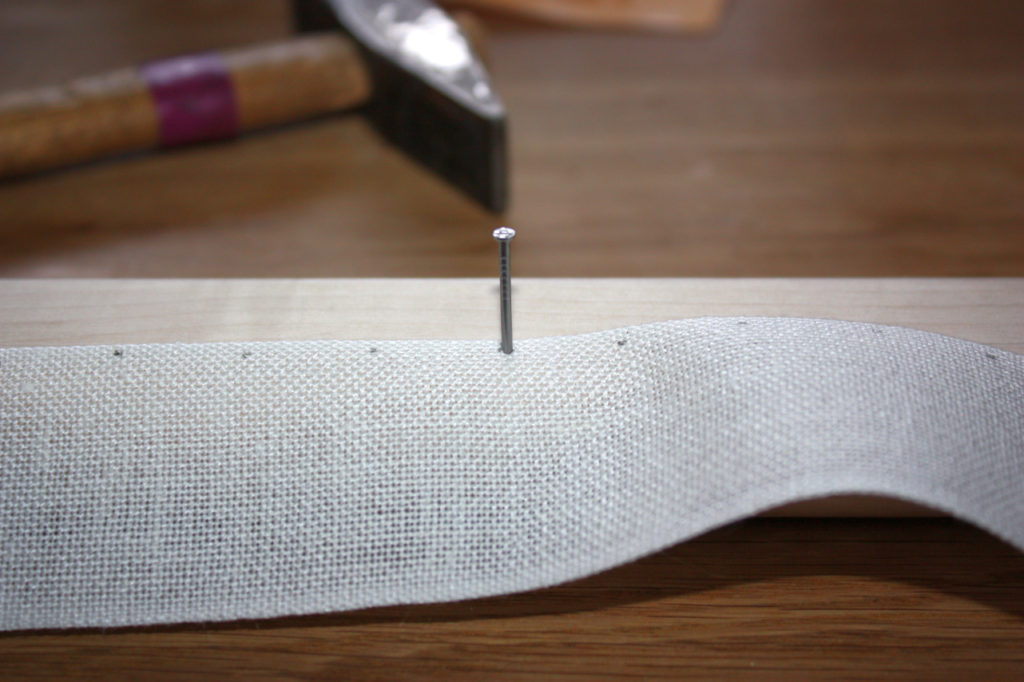
To make all this possible, though, you need the bands on top and bottom of the frame - and fitting these is a story of its own.
First of all, the bands are cut and their edges are hemmed. Then the real thing is up - the attachment. I use small copper tacks to attach the linen bands to the frame; they have to be placed close enough to each other so the band doesn't get a lot of opportunity to sag between attachment points.
They are tiny, and soft, and they look really nice. As they are tiny, it's rather fiddly to handle them, though. And because the wood of the frames - birch, beech, or maple - is rather hard, it's also very easy to just deform the tacks instead of hammering them in - which is why every one needs some pre-holing. I do that with help of a slim steel nail.
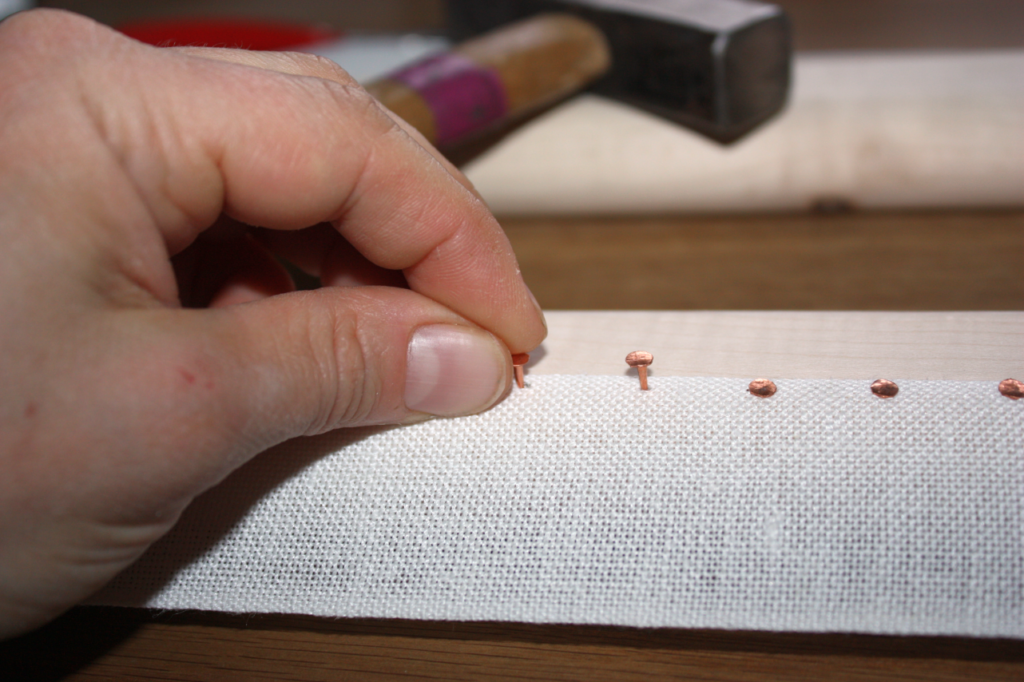
Once every attachment spot has its hole prepared through the band and into the wood, the tiny tacks are inserted into the holes, two or three at a time. Theoretically, I could insert all of them at once, but experience has shown that this does not save time, as the vibrations from hammering in their mates makes those further down the row jump out of their prepared holes again... which is not very helpful.
So there's bit by bit fitting and hammering, until all of the holes are filled. And then the process is repeated for the second of the bars for each frame.
Once that is done, the two fitted bars get bundled with their side slates and four pegs, turned out of the same wood - and they are ready to be used for some lovely embroidery!
If you're looking for a bit more to read, Isabella von Holstein's thesis "A light stable isotope (C, N, H, O) approach to identifying movement of medieval textiles in North West Europe" is available online here.
Twitter can be really useful sometimes - I learned there that the V&A London will open its new exhibition "Opus Anglicanum, Masterpieces of English Medieval Embroidery" on 1 October 2016, and the exhibition will run until 5 February 2017.
There's a programme of events related to the exhibition here, and the main page about the special exhibition is here. It looks like a spectacular line-up of gold embroidery, so if you can manage to get to London during the exhibition, it is surely worth a visit!
The next few events are drawing nearer - the European Textile Forum and the Nobilitas-Akademie, so I'm rather busy preparing for these. While the cat, helpful as ever, is sleeping in her cat bed beside my desk, making small adorable sleepy cat noises... that are more an incentive to cuddle her or curl up for a nap than to be as busy as I should be. Oh well.
Since I'm working on the presentation for the Akademie right now, I'm looking at embroidery-related stuff... and I have stumbled across a very early Italian pattern book that is freely available on the net: Alessandro Paganino's book "Il Burato". The book was published in 1518 and contains lots of patterns, plus the famous picture on how to transfer patterns to the fabric.
While you're at the website of the Textile Research Centre in Leiden, to get that pdf, do have a bit more of a look around - there is a lot of content, embroidery- and other textile craft-related, that is really worth exploring!
I spent the day yesterday looking at the embroidered linen altar cloths from the Altenberger Monastery, and they were really, really breathtaking. It took me a good long while to puzzle out how some of the intricate braided stitches were made, and after that I spent another good long while to look at all the stitch patterns to find that there are not so very many - but they are cunningly worked and varied in a way to look like many more different stitches.
As usual for a special exhibition, it was not permitted to take photographs, so you can picture me standing in front of the displays, periodically putting my nose close to the glass, squinting at details, then straightening back up and sketching manically. These altar cloths are large, and they are just filled with embroidery - thousands and thousands of stitches, an incredible amount of work.
If you can go there and have a look, it is really worth it - the exhibition is running until September 25, so there's still time to pay a visit to Frankfurt.
")
")