")
")


For some people, spinning from a wide bit of top - like those bands that you can usually buy, at least here in Germany - can be irksome. The spinning seems to have a tendency to wander from the very tip of the top, where you started, backwards along a thin sliver of the roving. After a while, you realise that while you are still spinning smoothly, you are somewhere along the band of roving, a good bit from where it started.
When spinning on a wheel, with your roving on your lap, this can be irritating. However, you can just take off your wandering yarn with a bit of fluffy roving attached to it, place the fluff over the start of your band, and spin (and maybe wander) on.
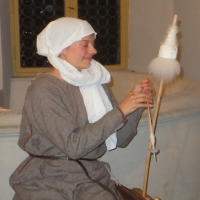
The situation is not as nice when you are spinning with hand-spindle and distaff. Here, spinning is much easier and smoother when you really stay at the tip of your top - because otherwise, you would need to unwind the roving from the distaff, and the free tip will then hang in the way and become mangled over time. Which leads to two questions: Why does the wandering draft happen, and what to do to avoid it?
Wandering draft can happen easily on the wide band of roving because it's just that - roving, with all the fibres aligned in one direction. The drafting zone you have when spinning, especially when spinning finer yarn, is a not very wide triangle - the upper part of the "fibre triangle" that is often praised as the effect that shows your ratio between twist and draft is good. Let's say your drafting triangle has an upper edge about 4 cm wide. Your industrially prepared top is much wider than that; when I spread out mine to a thin, draft-triangle thickness, it is about 25 cm wide.
Wandering draft usually happens when you spin on the fibres at one edge of the band. Think of your band as a rectangle and start on a corner, and you are practically guaranteed a wandering draft.
Why? Because on that wide stretch of fibres that are all aligned perpendicular to the top tip (can you tell I'm amused by that expression?), it's beyond easy for your drafting triangle to eat itself upwards along the band of fibres. The fibres right above your drafting zone on the band flow into the triangle naturally. After feeding from the same bit for only a short while, the edge you are spinning from is already different from the main top front edge. If you spin here for a bit longer, your triangle wanders back, eating itself along the edge of your roving - further back than a staple length, which is the length in which you could still transition to fibres from the main top tip. In effect, you have separated a bit of the band from the main part and are now spinning along that much smaller sliver of roving. And once this separation has happened, you need to jump back to the main edge as described above, because you cannot just smoothly glide back to the main edge.
So how can you keep from wandering like that?
There are two basic approaches that you can use: Change your style of drafting, or change the thickness of the roving.
If you watch out for the wandering tendency while spinning, you can make the drafting zone wander back and forth along the edge of the roving. This is easy if the difference between your roving width and the drafting triangle width is small, but gets harder with a very large difference. When you catch the backwards wandering early, you can gently pull your drafting zone back towards the top tip and proceed from there. Keeping the tip of top nicely (but not firmly) together into - more or less - a point makes this much easier, because it prevents you from spinning just at the "corner" of your band of roving. With a bit of practice, this control of your drafting area and shifting it before wandering draft zone occurs gets easier and easier.
The other possibility is the easier way out: Change the size of your sliver of roving. You can do that either by just gently splitting a piece of top into several portions lengthwise, or you can pull or diz it into a slimmer, longer band.
Dizzing is basically a pre-drafting process using a thing with a hole in it - any thing with a hole in it that's small enough to hold comfortably, like a small disc, a spindle whorl, a donut bead, whatever. You feed the very tip of your fibre top through the hole and then use the size of the hole to measure how much fibre is in the new, slimmer band - you gently push the diz into the top until it sits snugly, but not tightly, then grab the fibre just in front of the diz and gently pull. Push diz back along the now drawn-out fibre, pull again. I like to place my carded band on a table, clamp down on it with one flat hand a bit behind the diz for pulling, then use the other hand to pull. There's quite a lot of youtube videos of how to use a diz, though they usually show you how to diz a batt, diz from a drum carder or diz from wool combs. The process and the principle, however, are the same - using a hole of a certain diameter to help you measure out an even amount of fibre along your top. Here's just one example. I find using a diz much, much easier than pulling free-style with only my hands, but that's just me.
In addition, I feel that dizzing out will open the fibre a little already. If you are using industrially prepared wool that has been compressed or stored for a while, this does make a noticeable difference when spinning - the fibres have already been party unstuck from each other after dizzing.
You can experiment to find out how thick or thin you prefer your band of fibre to be for spinning comfortably. And combining the two approaches - learning how to keep the wandering in check and adjusting top size to spinning preferences - is the best and most efficient way. Knowing how to control a thicker bit of roving and how to prevent wandering back is a good skill to have as a spinner.
And the rest is just personal preference. I like to have a sliver that is not too thin, because I get very annoyed when my sliver breaks, and I don't mind taking a little care to prevent wandering backwards of my drafting zone; others like to have a really thin sliver where most of the drafting work is already done. There's no rule, and there's no roving size police - suit yourself. And remember to wind your fibre on a distaff for historically correct hand-spinning.
When spinning on a wheel, with your roving on your lap, this can be irritating. However, you can just take off your wandering yarn with a bit of fluffy roving attached to it, place the fluff over the start of your band, and spin (and maybe wander) on.
The situation is not as nice when you are spinning with hand-spindle and distaff. Here, spinning is much easier and smoother when you really stay at the tip of your top - because otherwise, you would need to unwind the roving from the distaff, and the free tip will then hang in the way and become mangled over time. Which leads to two questions: Why does the wandering draft happen, and what to do to avoid it?
Wandering draft can happen easily on the wide band of roving because it's just that - roving, with all the fibres aligned in one direction. The drafting zone you have when spinning, especially when spinning finer yarn, is a not very wide triangle - the upper part of the "fibre triangle" that is often praised as the effect that shows your ratio between twist and draft is good. Let's say your drafting triangle has an upper edge about 4 cm wide. Your industrially prepared top is much wider than that; when I spread out mine to a thin, draft-triangle thickness, it is about 25 cm wide.
Wandering draft usually happens when you spin on the fibres at one edge of the band. Think of your band as a rectangle and start on a corner, and you are practically guaranteed a wandering draft.
Why? Because on that wide stretch of fibres that are all aligned perpendicular to the top tip (can you tell I'm amused by that expression?), it's beyond easy for your drafting triangle to eat itself upwards along the band of fibres. The fibres right above your drafting zone on the band flow into the triangle naturally. After feeding from the same bit for only a short while, the edge you are spinning from is already different from the main top front edge. If you spin here for a bit longer, your triangle wanders back, eating itself along the edge of your roving - further back than a staple length, which is the length in which you could still transition to fibres from the main top tip. In effect, you have separated a bit of the band from the main part and are now spinning along that much smaller sliver of roving. And once this separation has happened, you need to jump back to the main edge as described above, because you cannot just smoothly glide back to the main edge.
So how can you keep from wandering like that?
There are two basic approaches that you can use: Change your style of drafting, or change the thickness of the roving.
If you watch out for the wandering tendency while spinning, you can make the drafting zone wander back and forth along the edge of the roving. This is easy if the difference between your roving width and the drafting triangle width is small, but gets harder with a very large difference. When you catch the backwards wandering early, you can gently pull your drafting zone back towards the top tip and proceed from there. Keeping the tip of top nicely (but not firmly) together into - more or less - a point makes this much easier, because it prevents you from spinning just at the "corner" of your band of roving. With a bit of practice, this control of your drafting area and shifting it before wandering draft zone occurs gets easier and easier.
The other possibility is the easier way out: Change the size of your sliver of roving. You can do that either by just gently splitting a piece of top into several portions lengthwise, or you can pull or diz it into a slimmer, longer band.
Dizzing is basically a pre-drafting process using a thing with a hole in it - any thing with a hole in it that's small enough to hold comfortably, like a small disc, a spindle whorl, a donut bead, whatever. You feed the very tip of your fibre top through the hole and then use the size of the hole to measure how much fibre is in the new, slimmer band - you gently push the diz into the top until it sits snugly, but not tightly, then grab the fibre just in front of the diz and gently pull. Push diz back along the now drawn-out fibre, pull again. I like to place my carded band on a table, clamp down on it with one flat hand a bit behind the diz for pulling, then use the other hand to pull. There's quite a lot of youtube videos of how to use a diz, though they usually show you how to diz a batt, diz from a drum carder or diz from wool combs. The process and the principle, however, are the same - using a hole of a certain diameter to help you measure out an even amount of fibre along your top. Here's just one example. I find using a diz much, much easier than pulling free-style with only my hands, but that's just me.
In addition, I feel that dizzing out will open the fibre a little already. If you are using industrially prepared wool that has been compressed or stored for a while, this does make a noticeable difference when spinning - the fibres have already been party unstuck from each other after dizzing.
You can experiment to find out how thick or thin you prefer your band of fibre to be for spinning comfortably. And combining the two approaches - learning how to keep the wandering in check and adjusting top size to spinning preferences - is the best and most efficient way. Knowing how to control a thicker bit of roving and how to prevent wandering back is a good skill to have as a spinner.
And the rest is just personal preference. I like to have a sliver that is not too thin, because I get very annoyed when my sliver breaks, and I don't mind taking a little care to prevent wandering backwards of my drafting zone; others like to have a really thin sliver where most of the drafting work is already done. There's no rule, and there's no roving size police - suit yourself. And remember to wind your fibre on a distaff for historically correct hand-spinning.


