Latest Comments

Harma Blog Break .
29. April 2024
Isn't the selvedge something to worry about in a later stage? It seems to me a lot more important th...
Beatrix Experiment!
23. April 2024
The video doesn´t work (at least for me). If I click on "activate" or the play-button it just disapp...
Katrin Spinning Speed Ponderings, Part I.
15. April 2024
As far as I know, some fabrics do get washed before they are sold, and some might not be. But I can'...
Kareina Spinning Speed Ponderings, Part I.
15. April 2024
I have seen you say few times that "no textile ever is finished before it's been wet and dried again...
Katrin How on earth did they do it?
27. März 2024
Ah, that's good to know! I might have a look around just out of curiosity. I've since learned that w...
DEZ.
17
3

Fabrics, fabrics, fabrics.

One of my upcoming projects is an introductory talk about fabrics used in the Middle Ages, especially for garments. It's an interesting topic, but also a rather large one, and one with a few problematic bits - such as different fabric types only surviving in rather different circumstances, without too much overlap.

I'm also still thinking about what needs to be included in the overview, and what would be especially interesting for Living History purposes. Obviously, there will be a little bit of the general basic stuff, as a refresher for those familiar with basic weaves and as a bringing-up-to-speed bit for those who are not. There's also the thing with wool not being alike, because much depends on what type of wool it is and how it's spun, or silk not being like any other silk, depending on whether it's spun silk or reeled silk, and whether reeled silk has been completely de-gummed or not, so these things will definitely get included.

Another thing I'm planning to cover is complex weaves, because these were part of medieval garment splendour, and even though they are hard to impossible to get these days, it is still important to know about them. So one of my upcoming tasks is to wind my brain around the internal construction of samite and lampas again, and find a good way of explaining these to non-weavers.

Apart from these, I'm still pondering what needs to be included, and what could be especially helpful or interesting for Living History purposes. Is there anything you are wondering about? Or would like to know more about? Let me know (and I'll try to give an answer here on the blog as well as include it in my intro...)!
0
DEZ.
06
0

Still much the same.

There's nothing much happening here - I'm still rootling around, enjoying that it's quieter now, trying to catch up on my backlogs (there are several, email being one of them) and trying to fix those small but pesky issues that had cropped up here and there.

The pallia newsletter subscription was one of those. Since starting the English newsletter in addition to the regular German one, I needed some way for new subscribers to choose which one to get (or if they want to get both).

That seemed not to be possible, at least not for somebody like me with no php skills whatsoever. So, as a workaround, I made a new list to subscribe to, which was supposed to automatically send a "Welcome"-Mail with the choice in it (thus also serving as the double-opt-in thing). Unfortunately, this did not work as intended either. To top everything off, the "subscribe to newsletter"-Checkbox appeared twice, once in the registration form for the shop and once in the checkout, and it only worked if checked in the checkout process. (You do not want to know how many test users I have subscribed to the newsletter trying to find out what goes wrong. And how many fake orders I put in...)

Since support was not willing to help, I've now solved the problem in a roundabout way. There is no more "subscribe to newsletter" checkbox in the registration or checkout anymore; instead, there are opt-in links in the email you will get after ordering.

I've also decided to finally switch to a different bank account, since my old bank has changed their terms and conditions in a way that totally does not suit me. So that is coming up in the next few days as well - hopefully transferring everything to the new bank will go smoothly.

It definitely feels very nice to get all those niggly things sorted out!
0
NOV.
26
0

Unexpected Difficulties.

Sometimes, things turn out to be more difficult than anyone would have guessed. One of these things, as I've learned, is... getting a room.

Not a room at a hotel, or youth hostel, or such things; I'm perfectly capable of that, and it is generally not a problem at all (unless you wait until the last minute and then try to get something cheap in a town where there's a fair going on...). I was looking for a room to give workshops. To be even more precise, to give a tablet weaving workshop.

A while ago, when I was preparing for the weaving weekend in Belgium, I had figured out a good plan on how to place tables, chairs, and weaving warps so that the room available could fit the participants we'd planned for. I have since tweaked this a tiny bit, and I can comfortably fit twelve weavers using six tables. (And clamps, of course. I think there's no workshop where I don't turn up with my clamps.)

[caption id="attachment_4902" align="alignnone" width="979"] 
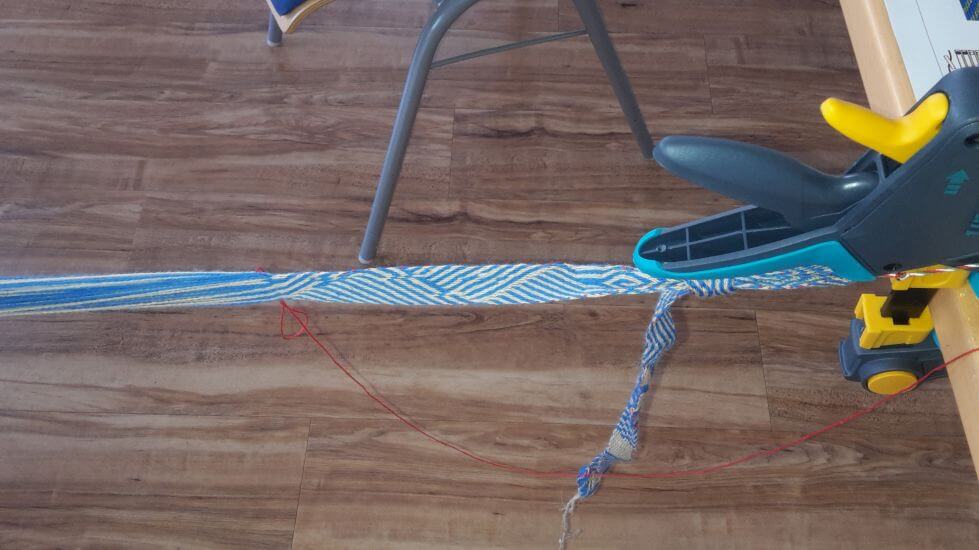
Table, clamp, band. I love this setup - it's quick, easy, versatile, and allows to have a wide choice on how to sit at the band.


For this constellation, I need a room size of no less than 6 by 9 metres, though - and it turned out that such a room for renting is very, very hard to find. Lots of people that I have talked to have expressed their wonder at this, and frankly, I would have thought it should be no problem either - before I started searching in earnest. Either there is such a room, but it is booked already, or the owners (especially churches) need it for themselves on Sunday, or it is not rented out over weekends, or it is completely unaffordable for me. I've managed to rent one room once, for my last workshop, but alas - this place is one of the "usually booked already" places.

Which means that, after searching for more than a month now, I was quite frustrated. So much that yesterday evening, I looked at our living room again... with a sharp eye, and a measuring tape, and the help of the Most Patient Husband of Them All (who really, absolutely, and utterly deserves this title - as my giving a full weekend workshop at home also means that our main living space is taken up).

There was then some drawing of available space, and some cutting of folding table mockups, and more measuring and thinking - and finally we came up with a method to fit up to eight weavers. Which is very good - and which means that I can finally, finally set the date for my next tablet weaving course, which will be a beginner's workshop. (It will be on March 7 and 8, by the way... description for the shop and booking possibility will come up tomorrow at the latest.)
0
SEP.
06
0

More about lace chapes.

I wrote a bit about my lace chapes project before the summer break already, but I think it's time for another bit of info on them. So for those of you in need to catch up: Lace chapes, historically speaking, were the equivalent of the aglet on shoe laces. They both protect the end of the lace against fraying and make it easier to thread the lace through a hole. When holding clothes together, such as doublet and hose, easy threading and un-threading is a very convenient thing.

Today, most of the lace chapes (or aglets, or aiglets, depending on who names them) that are sold as supplies for Living History are more or less cone-shaped, rather large (with a diameter of, usually, about 5 mm at the top), and often of a form more frequently found in the early modern age than in the Middle Ages. They are usually bought separately from the lace and then attached by sewing the lace to it through a pair of holes on the top. Here's a typical example, 26 mm long and 4.7 mm wide at the upper end, taken from the shop outfit4events.com:


The modern chapes you can buy always have a hole to attach them to the lace - obviously necessary, since they are sold empty.

Finds of medieval lace chapes sometimes have these holes, sometimes not. In the cases where there are holes, we often still have their original filling - which was not thread, but a rivet. Medieval chapes are also much smaller - often only 2 mm in diameter - and made from very thin material.

Since I've been asked time and again whether I could also offer "proper" medieval lace chapes, I finally got "Project Chapes" underway. I did some research, I asked some colleagues for info and good pictures (thank you again for your support, Beatrix and Gary!), I found a metalworker who said he'd be willing to make chapes. My plan was to have them made, then offer them both fitted to a lace and separately (with rivets to mount them the proper way), just like the other shops do.

Well. There's plans, and there is reality. The metalworker that I contacted was, basically, willing to make the chapes - but he would have to ask a much higher price than would be feasible for me to actually sell them on. Part of this was that when we did the tests together, we did not have the proper (very thin) brass sheet material, which did make a lot of a difference.

So in the end, I found the proper material, I sat down, and I did a few tests myself. With results that make me very happy, but - again - sort of shredded my plans...

Making lace chapes is like so many other craft tasks. If you have the proper materials, the proper tools, and you know which steps to do and how to do them, it is not a big deal. It took me a while to find out what I have to do to get proper results, and to get the tools together that will help me do the job. Especially the riveted versions are still rather fiddly, and I don't have all the proper materials, but I am getting there, slowly.

What I found out is this: You really don't need a lot of material, or thick sheet. The original chapes were often made from 0.1 mm thin brass sheeting, and that works wonderfully. The trick for making proper chapes, however, is that you have to work the chape directly onto the lace. There's no "making, then attaching" - it's both at the same time. Which also explains why in many cases, no rivets are needed; the chape is hammered around the lace so tightly that it will stay. In addition, the upper edge gets a slight faceting inwards at the end of the process, securing the chape even better. (It took me a good while, by the way, to fiddle out how best to do this faceting.)

[caption id="attachment_4804" align="alignnone" width="1023"] 
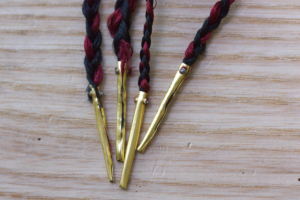
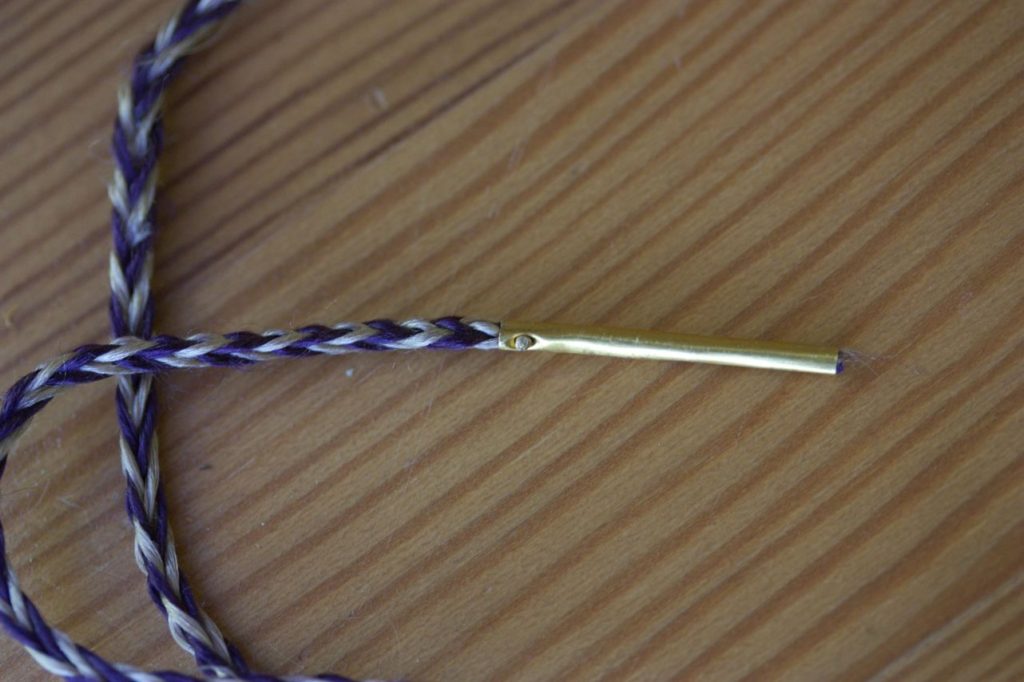
Chapes on a silk lace, braided, 26.5 cm length overall - that is the length from a find from London, and about exactly what you need to make the half-bow knot often seen on late medieval images that holds tunic and hose together.


This means, however, that I will not sell lace chapes on their own - because that would be useless. In theory, I could sell chapes with holes and accompanying rivets, but riveting these things is such an incredibly fiddly task that it would only result in disappointed, frustrated customers (and that would in turn disappoint and frustrate me). Also, getting the band into the empty metal sheet is hard, and the tighter the fit (which is what you want, the harder it is.

The way I see it from my trials now, if the lace in question is sturdy enough, it is sufficient to hammer the chape around the lace end, and be done. In cases where the lace is rather "untrustworthy", or when you want extra security, it's possible to add a rivet to the whole thing. I haven't got a real idea of when rivets were usually added yet, but I can definitely say that they are not always necessary, and that they are very, very fiddly to insert.

 
0
SEP.
04
6

About Yarns.

One of the questions I regularly get is about yarns - specifically about the use of plied yarns. As in "Did they really use single yarns in the Middle Ages for weaving?"

This is a fascinating question, because it shows how strongly we are influenced in our perception and our thinking by what we are used to. Most of the yarns that we can find in shops for crafting are plied, at least two-ply (that is twisted together from two single yarns, for those of you not familiar with that stuff), more often with more plies than that. Typical knitting yarns have four or even six singles plied together - so plied yarn is what we are most familiar with.

If we venture into weaving, most modern machine-spun yarns are rather soft, and not very strong. Consequently, modern hand-weavers use plied yarns for their weaving, at least for the warp. Many machine-woven fabrics do still use singles, but this is not obvious unless you look very closely at the weave, so it is outside our normal perception.

All this, taken together, leads to many people assuming that plied yarns were used for everything hand-made, like they generally are today. This, however, is not the case at all, and the "why" becomes clear once we think about the processes involved.

After preparation of the fibre - by washing and combing or, later in the Middle Ages, carding, the spinning process begins. This is a time-consuming thing, and there is a limit to how fast you can spin. (Yes, even if you learned how to spin when you were very young - just like there's a limit to how fast a given person can run. Or knit. Or cut up carrots. This will be different from person to person, depending on their talent, their practice, their current form, and how focused they are, but at one stage, everyone reaches their personal speed limit, and that's it.) Personally, I get to about 60 m per hour with a drop-spindle and distaff spinning short suspended, and I do consider that a decent speed yet still sustainable for a longer period of work.

A fabric of about 10 threads per cm in both warp and weft would be considered a middling-quality fabric in most archaeological textile terms. For an equally middling-quality garment, I would calculate roughly 3 m in length at 1 m in width, enough for a tunic for a full-grown man or a floor-length dress for a smaller woman. (These are all rough estimates here, and numbers have been chosen to make for slightly easier maths. Because. You know. Maths.)

To weave this amount of fabric, we would need a warp that is a bit longer than 3 m, as ther will be some loss at the top and bottom, plus there's always some shrinkage at the end. So let's settle for 3.5 m length when we warp for our fabric; that means 3.5 m times 100 cm warp width times 10 warp threads per centimetre... makes 3500 m of warp yarn. Three and a half kilometres. With my spinning speed, that would be close to 60 hours pure spinning time. (Realistically, you would add to this the time needed to skein the yarns, and also to dress the distaff whenever the fibre has been used up, so we'd be higher than that - but for our simple example, we'll leave it at this.)

Now we have the warp. The weft will use almost the same amount of yarn, as we have 100 cm fabric width times 300 cm fabric length plus say 20 cm to account for shrinkage times 10 threads per cm of length - so we'll be at about 3200 m yarn for the weft. Again, that's close to 55 hours of work.

We're now at a spinning time count of roughly 115 hours. For weaving with singles. Imagine you'd want to weave with two-ply yarn now... this means you would have to spin twice as thin (which will definitely not be faster, rather it will be slower, due to a number of reasons), and twice the amount. And then, in the final step, you will have to ply the yarn. Let's just assume that everything is done at about the same speed, for ease of calculation - now we have not 115 hours of work, but 345 hours. Or, if we break it over into a modern 35 hour week, that would be 9 weeks and 6 days instead of 3 weeks and 2 days. Both, by the way, only if you actually spend every single second of every day's work hours at your task (and we all know that this is possible, right? Happens all the time everywhere, I'm sure...).

So obviously, plying was not something done all the time, as it would have eaten up all the time. Whenever it was not really necessary, it was not done, and it's not really necessary for weaving fabrics, which would have been the bulk of textile production. There are techniques where you do need to ply for things to work properly - sewing, nalbinding, knitting, tablet weaving, some forms of braiding - but for normal weaving, saving the time and effort would have been a no-brainer in most cases.

Let me get back to the question that started all this. What is really intriguing about this question is how much our modern experience colours our perception of what is normal, and how things are generally done. With the yarn question, it becomes pretty obvious that this is the case, as things are very clear here. There are other topics, other areas, though, where it is by far not as conspicuous. For instance, industrialisation and mass production has also formed our expectations about how things look or should look - which is, often, "totally identical". If you have mass production not by machines, but with a human element in them, there will be differences between the individual items, and that is something we are not used to as much anymore.

An even more tricky aspect of this? We are very much used to most of our daily life things being mass-produced. They are affordable, or cheap, in most cases. Things not mass-produced, but made by hand, can be more expensive, though they are not necessarily that much pricier. Our perception that they will cost more, however, can keep us from even inquiring after a craftsperson about how much a custom-made item would cost. It also narrows our own imagination on what is possible to make. I remember a blacksmith friend telling me about customers coming into their shop to order a fence, asking for a catalogue with the patterns available - and they were astonished, and a felt a little swamped, when they were told that there is no necessity to keep to the samples shown, they could also make up their own pattern ideas.

Things like this, living in the back of our minds, reinforced by our daily life objects, are harder to trace than where the plied-yarns-are-the-only-thing thing comes from. They are, however, just as likely to skew our picture of things, and our perception, which can be rather harmful when trying to reconstruct past industries or societies. Once more, watching one's own brain think and asking some questions about where a concept comes from is definitely a good thing!
0
JULI
01
0

Lace Chapes, Continued.

Something that has happened to me time and again:

I look at some medieval Thing. I sort of try to figure out how it was made. I read up on more details of the Thing, and the Type of Things. I find out that there was quite some variation, and that some of the assumptions I made when seeing only Thing are not correct.

I read up more on Type of Things. I find something about it that sounds... weird. Like "how on Earth can that work" weird. "Whyever would you want to do that with this tool/material/method" weird.

I fiddle around some more with doing stuff. I try the weird-seeming tool, material, or method. I find it works brilliantly - much better than my own ideas that I used in my first tries.

I stand there, humbled, and realise again that living a couple of hundred years later does not make anyone automatically smarter, or better at doing something that was already successfully done, and developed to best efficiency, back then.

At least these days, I've been humbled often enough and learned enough about this that it does not take me very long to try out the original materials or (possible) methods... as opposed to when I was a teenager and getting started with Living History.

In the most recent case, by the way, the Things are the lace chapes, and the Weird Thing About Them was the indication that at least some chapes (possibly not all of them, but this is a tiny detail that may be hard to see or evaluate anyways, due to several different reasons) were riveted with an iron rivet.

Now, those chapes are tiny. (I mentioned that, right?) They are made from very thin brass sheeting, so once they are bent, they are a good bit stabler than the flat sheeting, but it's still a relatively soft material. Iron is much harder than brass... but I did find that using a soft iron wire to make the rivet does work better than using a dedicated brass rivet (yes, you can get them in so tiny).


So. I stand humbled, and corrected, and will happily go on pounding the heck out of soft iron when riveting. (Very carefully, though, rather softly, and with a very small hammer. I lovingly call it my "Mädchenhammer"... my girls's hammer.)

Now what is left to do is figure out how to offer these in the shop - which kinds of bands, which lengths of chapes, which lengths of bands. (Obviously, I'll be able to make specific lengths on demand, but setting up the shop attributes for that might not work...) If you do Living History, use laces with chapes (or laces without them) and have comments for me, they are very welcome!
0
JUNI
28
2

Lace Chapes - Or: How To Tiny Metal.

I've been asked about proper, nice, authentic lace chapes again and again over the past years... so this has been on my list for ages now.

Lace chapes, for those of you not into medieval dress accessories, are like the plastic endcaps on shoelaces - they protect the lace from unraveling, and they make threading the lace through holes or eyelets much easier. Especially in the later Middle Ages, the style of dress for both women and men uses lots of laces to get things nice and tight-fitting on the body... and for all those laces, chapes are really handy.

The tiny problem is, though: The chapes you can usually buy today are way too large, and they are often cast, while the originals were made from sheet metal with use of a hammer and much smaller. How much smaller? Well. The modern ones I could find quickly when pretending to shop for some have a top diameter of about 5 mm. The medieval originals that I have nice documentation for have a top diameter of between 2 and 3 mm. That is... much smaller.

Most modern laces with chapes are also held together with a few stitches, while those original chapes that survived with lace in them are usually riveted to lock in the lace.

So recently, I have gotten some material to give this a try... then I played around some more. Then I bought some additional tools. Then I made some more tools. Fiddled around some more. Researched what was inside those chapes.

I'm getting there now. I can tell you, though: These things are tiny. TINY. And it's incredibly fiddly to set those infinitesitiny rivets without bashing the chape itself to pieces...


...but I'm getting there. This is one of the latest prototypes I've made, with 2 mm diameter at the top. And just so you get an idea of the size, here's a bigger one (with a good 3 mm diameter top) in my fingers:


I had originally planned to make these chapes and sell them, together with rivets, for customers to assemble with their band of choice. It looks to me, though, as if the originals were hammered close around the lace, then riveted for extra security. Even if you put this aside and assume it will be possible to stick enough of the lace into the closed chape, successfully setting a first rivet took me several tries, complete with totally bashed chapes. So I'll have to offer the chapes mounted on laces, all set and finished, to save everybody's nerves.

Which means I had to take a closer look at the laces involved...
0

Kontakt