Latest Comments

Harma Blog Break .
29. April 2024
Isn't the selvedge something to worry about in a later stage? It seems to me a lot more important th...
Beatrix Experiment!
23. April 2024
The video doesn´t work (at least for me). If I click on "activate" or the play-button it just disapp...
Katrin Spinning Speed Ponderings, Part I.
15. April 2024
As far as I know, some fabrics do get washed before they are sold, and some might not be. But I can'...
Kareina Spinning Speed Ponderings, Part I.
15. April 2024
I have seen you say few times that "no textile ever is finished before it's been wet and dried again...
Katrin How on earth did they do it?
27. März 2024
Ah, that's good to know! I might have a look around just out of curiosity. I've since learned that w...
JUNI
27
0

Tablet weaving Shenanigans, Part 2 - or: Don't forget the weft.

When I started out trying to reconstruct how twill may have been tablet woven back in the Middle Ages, I had a list of things that the method would need to deliver - if you like being fancy, you could say I had a Requirement Specification. Apart from the obvious (has to work without written patterns, has to work with an indefinite number of tablets), one of my list items was "has to be robust" as in the system should be so workable that it is possible to stop at any time and take up the work again without a problem, and that it should be possible to weave while other stuff is going on in the vicinity, or while you're not one hundred percent fit. Also obviously, weaving really complex patterns in fine silk on a wide band won't work if you are bone tired and there is a bunch of people nattering at you - but to do simpler twill motifs, it should not matter if there is a group of others chatting in the same room, and you are keeping half an ear on it, occasionally joining into the chat.

Both the coffee cup weaving and the UFO weaving took place while there was a pen-and-paper roleplaying session going on in the same room, which for me sort of qualifies as "mildly distractive environment". So for my expectations, the system is robust enough; it does happen occasionally that I forget to re-order a few tablets, but I usually catch this even before turning them, and if I don't, it becomes really obvious right afterwards, and is easy to fix. (Turn the offenders back, sort, re-turn them.)

Something that happens even more occasionally, but that is much, much more of a nuisance: Forgetting a weft thread. This has really obnoxious results. First of all, it only becomes rather obvious a good while after the vile deed has happened, and I'm usually not willing to unweave two picks to fix the issue. Unfixed, the forgetting of a weft results in long floats across the width of the band, which can be very obvious if you are looking at the structure (or are a nitpicky person and are looking for mistakes). It actually happened twice when I was doing the UFO, see if you can find the spots:


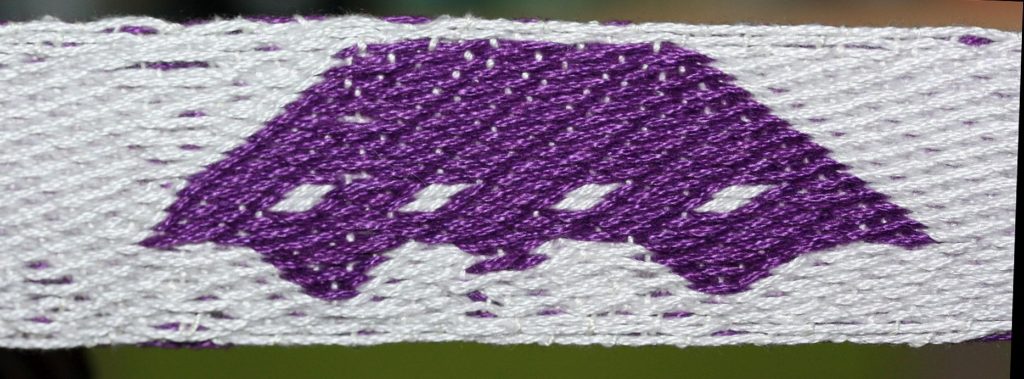
Have you found them?

The second effect of forgetting a weft, which is at least as annoying, is that I use the side the shuttle hangs on as an indicator of what may or may not be done at that stage, pattern-wise. So having forgotten a weft, this changes, which can be confusing, even when using a marker on one side of the band to keep track of the "do-things-side" as opposed to the "maintenance-mode-side".

I complained about this to the Most Patient Husband Of Them All, and he quite correctly said that there must be a way to see that the weft thread is missing... so we spent a while discussing all the possible ways we could, collectively, think of.

The end result was that since the missing weft causes a change in the band structure, it is possible to see it right after you turn the tablets and press in the shed. However, since every thread is only tied down by the weft every fourth pass, this means only every fourth tablet shows this structural difference - so it is visible, but it is very subtle.

Here is how it looks with the weft thread in:


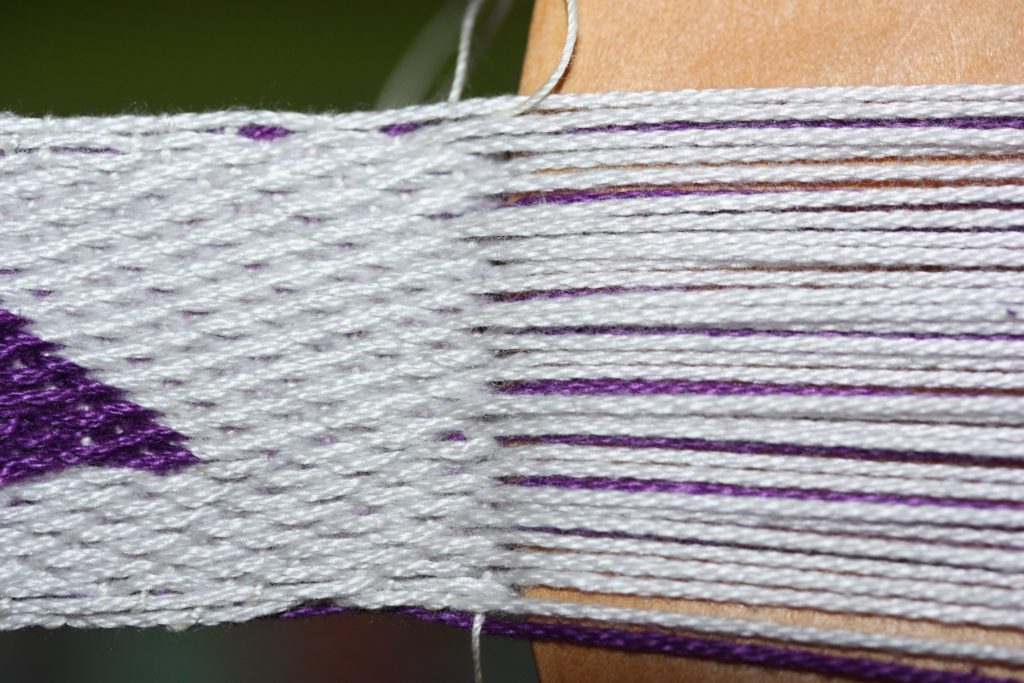
And this is the same pick without the weft thread:


It's no wonder I never noticed before when I had missed putting in a weft (and none of my students did when this happened in a workshop). Now that I know what to look for, though, I'll keep an eye open for the telltale tiny gaps on the edge of the weaving knife when pressing in.

Are you occasionally forgetting the weft? Do you go back when that happens to you?
0
JUNI
18
0

Visiting Lauresham (part 1)


Friday before last, I had a Grand Day Out - I hopped onto the train early in the morning to go to Lorsch, or rather to Lauresham, in preparation for the European Textile Forum.


Usually, we have this little conference in Mayen, at the Lab for Experimental Archaeology, but this year, LEA is due for some construction works. As it was not entirely clear in time when those works would be finished, we had to find an alternative place to hold the Forum, to be on the safe side.


To my great delight, as I have fond memories of working on archaeological digs in Lorsch, the good people at the Open-Air Laboratory for Experimental Archaeology Lauresham offered us their place to be. Because going to the venue for a visit is always a good thing (you don't want to plan a conference blind!), after figuring out most of the things that needed figuring out via mail and phone, off I was to meet with Claus Kropp, the leader of the Lab.


The place where we will be for our conference (at least mostly) is the Visitor Info Centre, which looks a bit like a glass house:


When you are closer, you can see that it's actually not a glass house to grow plants, but to grow knowledge:


There are rooms in the blocks inside for working, and things such as conferences, or school events, or small exhibitions. There's also space for exhibitions in the corridor, which - with all that glass - is very light and spacious-feeling. We will be a very happy group in that place!


There is, of course, also a little museum shop where you can get all kinds of things: honey made by bees on the location (bees are important in Lauresham, not least because there is a manuscript with a bee-keeping prayer written in Lorsch in the 9th century), mugs with an artistic rendition of Lauresham, ceramic mugs and music instruments and piggy banks...


...and you can even buy a reproduction of a pin found directly in Lorsch, dating to the 8th/9th century:


Besides checking out this building, I also got treated to a tour of the grounds of Lauresham proper. It was absolutely beautiful - there's a small vinyard, there are fields tilled with reconstructed ploughs using the working animals in Lauresham. The grains that are farmed here are of course old and often very rare kinds, such as this special type of rye, Waldstaudenroggen:


There are also Valais Blackneck goats, a very old breed:


Lauresham, as an ideal-typical reconstruction of an early medieval manor farm also has a small chapel, with a door modelled after an original 8th century find from Germany:


More from my visit tomorrow!

0
JUNI
06
0

New Spindle Whorls!


The new spindle whorls have arrived, and they are lovely!


While I make the hand-formed whorls myself, I have a professional potter who throws the whorls for me, after "inspirational pictures" of finds of spindle whorls that I send him. I always order a large batch (as that makes things more efficient), and it is a special pleasure to write there, as he lives close to the place I was born... so I am, in some way, buying "native soil".


This time around, I had done some more research and found that light-coloured whorls seem to also have been rather common. So I did ask for a second, light colour clay for the whorls - and I got a third colour thrown in for good measure.


I also asked for some lighter-weight ones. Fun fact: The current production of wheel-thrown whorls happened to peak in the same weight slots as my last production of hand-formed ones, which is in the 20-22 g slot.


So now I am fully stocked again with whorls! I even have them all weighed and sorted already. When I started selling spindle whorls, I kept them in one large box, and I picked out one when somebody ordered. But since some orders are for a specific weight, I've found that it is much easier for me to weigh them all once and keep them into some kind of sorting box, organised into 2 g slots. That way, if someone asks for a 21 g whorl, I only have to look at the 20-22 g whorls to find the right one (and yes, I will put them onto the scales again and see if I can't find one that is somewhere between 20.7 and 21.3 g... just because I can).


Sorting whorls. If you have been at my real-life market stall, you may have seen these boxes come out when someone asks for a whorl in a specific weight range!


If you feel like you need one, the shop is updated, and I'm all happy to sell these new colours and new old shapes!

0
MAI
16
1

Spindle Whorl Hit and Miss.


After showing you the dead whorls yesterday, it's probably time to also show you the survivors - so here's part of the yield, hanging out in a basket and feeling decorative:


By now, the whorls have all been weighed and are sorted in boxes - they range from below 8 g to almost 70 g in weight. The heavy ones are modeled after prehistoric whorl finds - and yes, it is astonishingly hard to match a given size and shape, as you can see here:


I find it really hard to make some shapes, among them the longish ones and the ones with a sort of T-profile. Roundish or double-conical is much easier for me, and I'm wondering if someone else would have a different experience, or if there's some special technique to making these other shapes easily. You can see in the picture that I didn't really match the original shape of whorl no. 14 - even though I tried really hard!


In some cases, with some shapes, I am quite happy with how close I got, though. Like with this one:


As a final note, it might amuse you that I managed to get only a few whorls within the weight range I was mostly aiming for - while I happened to (again) hit spot-on a few other ranges with a lot of whorls. If this continues, I might have to make a sale for these weight ranges!

1
MAI
15
1

Exploding Whorls and Salamander Snacks.


The spindle whorl firing is done - so now I have plenty of hand-formed spindle whorls again. This time around, there are some decorated ones, and quite a few of these are formed after actual examples from prehistoric finds. Though, of course, I cannot guarantee that their shapes and weights are close to the originals - especially their weight will probably be quite different even if the size and shape matches, as different materials and different amounts of water and temper make a huge difference in the density - and thus the weight at similar size.


This is one of the many reasons why making whorls and pit-firing them never gets un-exciting. It may be boring (forming whorl after whorl after whorl can be really mind-numbing), but there is always a good amount of insecurity left. Especially regarding firing.


Will they all get enough heat? How many of them will be completely black, or completely light? And most importantly:
How many of them will come out undamaged?


As the pit-firing procedure is only sort of controlled, some whorls in the batch usually come out more or less of damaged. The most common cause is probably a small air bubble that has gotten trapped inside, followed by adverse conditions when heating up, such as getting too much heat too quickly, or too much heat only on part of the piece. Or the clay being still a little bit too moist - even though I try to make sure that the whorls have enough time to really dry out.


Obviously, all these things are more probable on the really large whorls - and this batch, one of the big ones did die a spectacular death, giving out two very loud bangs right after I started the firing. It was accompanied in its venture to explode by two smaller ones... so a total loss of three whorls for the firing batch.


While this is, obviously, a total loss, there are always some whorls that only lose a little chip off their surface. They are otherwise still okay, and they can work just like undamaged ones - but of course they are not making their way into my for-sale stash of whorls.


I call these whorls "Salamander Snacks" because, as every reader of medieval bestiaries knows, the salamander can live in the fire unharmed. So obviously, the reason for how these whorls look is that a salamander living in the fire got a little peckish and took a nibble (or in some cases, a bite) out of a whorl.


While last time around, I had quite a few salamander snacks in the batch, this time it was only a single one - but the salamander has been quite hungry, it seems, as it took a large-ish bite:


I hope it enjoyed its snack!

0
MAI
02
0

New Spindle Whorls, Ready to Burn.


I'm off to the Nadelwelt - in case you are going there, you can find me and Margit at booth F2.3, just like in the last years.


I haven't managed to fire the next batch of spindle whorls before the fair, so they will have another few days to hang out. Possibly that is a good thing, too, because then they will definitely be completely dried out, and that results in less losses due to cracking.


Here they are, all hanging out on the table:


It's a clay that fires up to a light grey colour. Actually it's two clays that fire up to a light colour, as I have used up the last of my previous batch. Some of the whorls are already made from the new clay, which is looking a little bit lighter in the unfired-but-dry stage, so I'm very curious to see how it will look when fired. The bits that are not in a reducing atmosphere, that is...


This time around, I have also played a little with some decorations on some of the whorls. Most of the decorated ones are closely modelled after extant finds from prehistoric times, and a few are modeled after finds from the Celtic era. I did try to match both the form and the size as closely as possible, and found once more that there are forms I find very easy and natural to do, and others that I have not figured out the perfect method yet. So there's more to learn... which will have to wait for the next batch, though.


For now, I'm looking forward to the firing, it's always a fun thing to do, and it's always exciting to see how they all turn out!

0
APR.
11
0

Outfitting Embroidery Frames


Here are a few images from the workspace, so to say - I've been outfitting part of the new embroidery frames with bands to attach the fabric.


The way these frames work is rather simple: You baste or herring-bone-stitch your embroidery ground fabric to the bands at top and bottom of the frame. Then you tension the fabric between the frame bars with help of the wooden pegs; if your fabric is a long strip, you can roll it around one of the frame bars to store the excess. (The bars are fairly rounded to avoid sharp crimps in the fabric or, as you progress, in the embroidered fabric.)


Once your vertical tension is thus established, you get a nice horizontal tension by stitching the left and right edges to the vertical slates. Using a needle, you pierce the fabric, then wind your tensioning thread around the slate, then go through the fabric again.


This setup of the fabric is, obviously, more time-consuming than just plopping a modern round embroidery frame onto a piece of fabric, but it will give you a higher, more controlled tension that will not slack off quickly or easily.


To make all this possible, though, you need the bands on top and bottom of the frame - and fitting these is a story of its own.


First of all, the bands are cut and their edges are hemmed. Then the real thing is up - the attachment. I use small copper tacks to attach the linen bands to the frame; they have to be placed close enough to each other so the band doesn't get a lot of opportunity to sag between attachment points.


They are tiny, and soft, and they look really nice. As they are tiny, it's rather fiddly to handle them, though. And because the wood of the frames - birch, beech, or maple - is rather hard, it's also very easy to just deform the tacks instead of hammering them in - which is why every one needs some pre-holing. I do that with help of a slim steel nail.


Once every attachment spot has its hole prepared through the band and into the wood, the tiny tacks are inserted into the holes, two or three at a time. Theoretically, I could insert all of them at once, but experience has shown that this does not save time, as the vibrations from hammering in their mates makes those further down the row jump out of their prepared holes again... which is not very helpful.


So there's bit by bit fitting and hammering, until all of the holes are filled. And then the process is repeated for the second of the bars for each frame.


Once that is done, the two fitted bars get bundled with their side slates and four pegs, turned out of the same wood - and they are ready to be used for some lovely embroidery!

0

Kontakt