
Latest Comments

Guest - Aislinn Dyestuff Citizen Science.
09. Oktober 2026
This is a great project. I look forward to the results. Thanks for letting us know.
Guest - Aislinn Time for...
09. Oktober 2026
Looks delicious!
Guest - Katrin Sprang Discussion
18. September 2026
Hi Rachel, I have looked for more photos of you, but that was not very successful. I found a link on...
Guest - Beatrix Sprang Discussion
15. September 2026
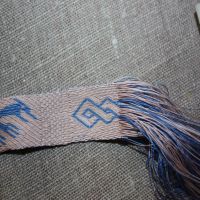
That lozenge pattern element is not a photograph, but a scan. So it should be to scale. But I pinned...
Guest - Katrin Sprang Discussion
15. September 2026
I was not referring to Rachel's reconstruction (is the reconstruction you refer to the one photograp...
MAI
09
2

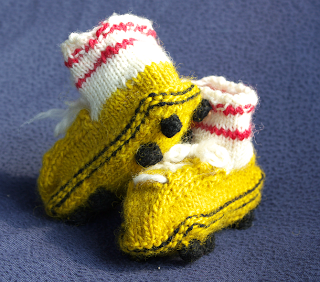
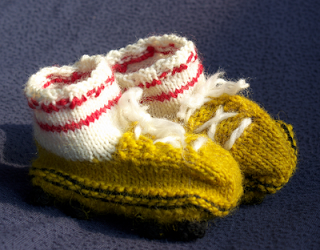
There they are. Soccer booties.

A few weeks ago, I wrote about a stealth baby knitting project. The item in question has, meanwhile, been finished, laughed about, gifted and has been favourably received by the mother-to-be.

And that means I can unveil them to you now...the soccer booties.
These soccer booties are based on a simple, basic bootie pattern with laces (Michelle Lo's "Sneaker Booties", free Ravelry pattern). The booties are worked cuff-down and in the round in the sock part, then the upper part of the shoe is worked in the flat. The sides of the shoe are worked in the round again, and the sole knitting closes off the bootie.
The booties were knit with different yarns, mostly about worsted weight, on 2.5 mm needles. I brought in colour changes and added bobbles to simulate the cleats on the sole. Working those in different, contrasting colours is what makes the finished item really pop – that, however, also means a lot of ends to weave in. You are duly warned.

Step 1:
Find out which colours to use. Do not skip this step – it is a safe bet that somebody who will be amused or delighted by these booties has a preference for a club. Clubs have their own colours. And choosing the wrong colours – that of the faved club’s main adversary, for example – will most probably lead to severe diminishment of both amusement and delight.

Step 2:
Decide on your colour scheme. You can work two colours in the socks or work the socks in one colour and the shoes in another (more or less neutral) colour. Modern soccer shoes are black, yellow, blue, red, white or brown; other colours are rather rare. The cleats come out best if they are knitted in a contrasting colour.

Instructions here are given for a two-colour sock (with two narrow stripes near the cuff) and two-coloured shoes. Photos are of the prototype; I tweaked the written pattern after that, which means it should come out a bit better now. Please let me know if you find mistakes!

Step 3:
Start knitting.
CO 36 sts in main sock colour. Join without twisting; place m to mark start of round.
Rd. 1-3: Work k2 p2 ribbing.
Rd. 4: k in sock contrast colour.
Rd. 5: sl 1st st, k in main sock colour.
Rd. 6-7: k in main sock colour.
Rd. 8: k in sock contrast colour.
Rd. 9: sl 1st st, k in main sock colour.
Rd. 10 – 15: k in main sock colour.
Rd. 16: k in main shoe colour.
Rd. 17: p in main shoe colour.
Rd. 18: sl 1st st, k to end.

Shoe upper starts now.
Setup row: k 18 sts, turn; purl 12 sts. Turn.
Row 1: (RS) k2, ssk, yo, p4, yo, k2tog, k2. If you prefer, you can slip the first st after turning in the shoe upper part; this can make picking up stitches easier.
Row 2: (WS) p4, k4, p4
Row 3: k4, p4, k4
Row 4: p4, k4, p4
Repeat R 1-4 two times more, then work R1 once.
Work 5 rows in stocking stitch (you end on a WS row). Turn.

Shoe sides start now.
Knit 12, do not turn. Pick up and knit 12 stitches along the edge; knit across live stitches; pick up and knit 12 stitches along the second edge. 60 st in total. Move m to current position (new start of round).
Rd 1-5: knit.
Rd. 6: purl.
Rd. 7: sl 1 st, p in shoe contrast colour.
Rd. 8: p 1st stitch in shoe contrast colour, change to shoe main colour, p to end of rd.

Sole starts now.
The sole is worked by knitting back and forth and knitting the last sole stitch together with the first live stitch from the shoe side rounds. You will work the basic rows (rs and ws), substituting a bobble row for the basic row in row 5, 11, 27 and 31.

Basic right-side row (odd numbers): k 11, ssk, turn.
Basic wrong-side row (even numbers): p 11, p2tog, turn.
Bobble row (work on r 5, 11, 27 and 31): k 2. Make bobble, k6, make bobble, k1, ssk, turn.

Make bobble: Bring in shoe contrast colour and work 7 st in next st by working the following: k, yo, k, yo, k, yo, k. (You can count the four knits to keep track.) Turn work, p 7. Turn, k 7. Turn, p 7. Sl 3 st to right needle, k 1, sl other st over this knit st, alternating between st from left and right needle. Take up main colour again and continue knitting with main colour. Snip off contrast colour, leaving a nice long tail.

When you have only 24 st left on your needles after R 36, graft the sole stitches together with the remaining live stitches from the shoe side rounds.

Finishing up:
Weave ends in securely. With the longer tail left after each cleat bobble, sew the bobble sides to the shoe sole for extra security. Block if desired, thread in laces.

Step 4: Laugh about the silly little soccer booties. Give to somebody-not-yet-walking to wear them. Enjoy.
0
APR.
20
0

Spinning from Top and the Wandering Draft Zone

For some people, spinning from a wide bit of top - like those bands that you can usually buy, at least here in Germany - can be irksome. The spinning seems to have a tendency to wander from the very tip of the top, where you started, backwards along a thin sliver of the roving. After a while, you realise that while you are still spinning smoothly, you are somewhere along the band of roving, a good bit from where it started.

When spinning on a wheel, with your roving on your lap, this can be irritating. However, you can just take off your wandering yarn with a bit of fluffy roving attached to it, place the fluff over the start of your band, and spin (and maybe wander) on.

The situation is not as nice when you are spinning with hand-spindle and distaff. Here, spinning is much easier and smoother when you really stay at the tip of your top - because otherwise, you would need to unwind the roving from the distaff, and the free tip will then hang in the way and become mangled over time. Which leads to two questions: Why does the wandering draft happen, and what to do to avoid it?

Wandering draft can happen easily on the wide band of roving because it's just that - roving, with all the fibres aligned in one direction. The drafting zone you have when spinning, especially when spinning finer yarn, is a not very wide triangle - the upper part of the "fibre triangle" that is often praised as the effect that shows your ratio between twist and draft is good. Let's say your drafting triangle has an upper edge about 4 cm wide. Your industrially prepared top is much wider than that; when I spread out mine to a thin, draft-triangle thickness, it is about 25 cm wide.

Wandering draft usually happens when you spin on the fibres at one edge of the band. Think of your band as a rectangle and start on a corner, and you are practically guaranteed a wandering draft.
Why? Because on that wide stretch of fibres that are all aligned perpendicular to the top tip (can you tell I'm amused by that expression?), it's beyond easy for your drafting triangle to eat itself upwards along the band of fibres. The fibres right above your drafting zone on the band flow into the triangle naturally. After feeding from the same bit for only a short while, the edge you are spinning from is already different from the main top front edge. If you spin here for a bit longer, your triangle wanders back, eating itself along the edge of your roving - further back than a staple length, which is the length in which you could still transition to fibres from the main top tip. In effect, you have separated a bit of the band from the main part and are now spinning along that much smaller sliver of roving. And once this separation has happened, you need to jump back to the main edge as described above, because you cannot just smoothly glide back to the  main edge.

So how can you keep from wandering like that?
There are two basic approaches that you can use: Change your style of drafting, or change the thickness of the roving.
If you watch out for the wandering tendency while spinning, you can make the drafting zone wander back and forth along the edge of the roving. This is easy if the difference between your roving width and the drafting triangle width is small, but gets harder with a very large difference. When you catch the backwards wandering early, you can gently pull your drafting zone back towards the top tip and proceed from there. Keeping the tip of top nicely (but not firmly) together into - more or less - a point makes this much easier, because it prevents you from spinning just at the "corner" of your band of roving. With a bit of practice, this control of your drafting area and shifting it before wandering draft zone occurs gets easier and easier.

The other possibility is the easier way out: Change the size of your sliver of roving. You can do that either by just gently splitting a piece of top into several portions lengthwise, or you can pull or diz it into a slimmer, longer band.
Dizzing is basically a pre-drafting process using a thing with a hole in it - any thing with a hole in it that's small enough to hold comfortably, like a small disc, a spindle whorl, a donut bead, whatever. You feed the very tip of your fibre top through the hole and then use the size of the hole to measure how much fibre is in the new, slimmer band - you gently push the diz into the top until it sits snugly, but not tightly, then grab the fibre just in front of the diz and gently pull. Push diz back along the now drawn-out fibre, pull again. I like to place my carded band on a table, clamp down on it with one flat hand a bit behind the diz for pulling, then use the other hand to pull. There's quite a lot of youtube videos of how to use a diz, though they usually show you how to diz a batt, diz from a drum carder or diz from wool combs. The process and the principle, however, are the same - using a hole of a certain diameter to help you measure out an even amount of fibre along your top. Here's just one example. I find using a diz much, much easier than pulling free-style with only my hands, but that's just me.
In addition, I feel that dizzing out will open the fibre a little already. If you are using industrially prepared wool that has been compressed or stored for a while, this does make a noticeable difference when spinning - the fibres have already been party unstuck from each other after dizzing.

You can experiment to find out how thick or thin you prefer your band of fibre to be for spinning comfortably. And combining the two approaches - learning how to keep the wandering in check and adjusting top size to spinning preferences - is the best and most efficient way. Knowing how to control a thicker bit of roving and how to prevent wandering back is a good skill to have as a spinner.
And the rest is just personal preference. I like to have a sliver that is not too thin, because I get very annoyed when my sliver breaks, and I don't mind taking a little care to prevent wandering backwards of my drafting zone; others like to have a really thin sliver where most of the drafting work is already done. There's no rule, and there's no roving size police - suit yourself. And remember to wind your fibre on a distaff for historically correct hand-spinning.
0
APR.
19
2

The Colour Dilemma.

As the longterm readers here know, I frequently work together for all things textile with Sabine from the Wollschmiede, my dyer of choice.

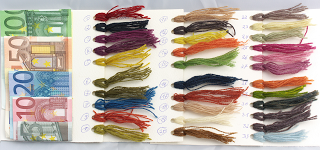
Sabine has been working on colour sample cards for her range of colours this winter, and she is currently at sample colour 68 - with more to come in the future, if I know her at all. And she is now getting the first requests for sample cards.
There's a problem, however. Making a sample card takes yarn - and time. Especially time. And providing a sample card or even a full set of sample cards with the full range would be keeping her from other work - and would have to be quite, quite costly.

The obvious solution is to have a digital photo version of the cards, just like a lot of other shops have, where you can download a photo or a .pdf file to see the colour range. But if you have ever taken a look at one of these, you also know the typical disclaimer - your monitor colours may vary, and there's no way to be sure that the colour you see will really be the colour you get. (Well, apart from the obvious slight changes to colours from dye lot to dye lot regardless of whether you do natural or chemical colours.)

This is due to the nature of the colour system used on monitors. The RGB system has three colours, red, green and blue. Mixing these can get you all the other colours (or at least enough that you won't miss any). You can also adjust your monitor settings - there's usually a menu somewhere in the system settings where you find three sliders to change the values (the saturation) of the three colours. (If you want a longer, in-depth explanation, you can find one here at Wikipedia.)

So while your monitor might not show all the colours correctly initially, it is technically possible to adjust the settings to at least get a good, if not perfect, match. High-end monitors and graphics professionals use a calibration device to make sure that what they see is what they will get (even if they print it), but this is of course not feasible for us ordinary mortals.
Now, if I'm only taking a photo for myself, I can always place something colourful that is mine beside the thing and then adjust the monitor (or the colours in the picture) to match my colour-matchy object. But if the thing is to be sent out... that makes things a bit more difficult.

So Sabine and I thought about things, and I finally found a solution. It's the low-key approach (in German, I would jokingly call it a "Hausfrauenlösung" - the housewife's solution, something that is simple and practical yet very effective). The colour match addition to the photo. Something that almost everybody that will be interested in getting the colour sample cards for an order from Sabine will have, or be able to obtain at no additional cost. The Something available almost everywhere in Europe, where it's used in thousands every day. The Something that comes in blue, red and orange as well as two shades of green (one more easily available than the other). The Something with colours fixed and stable enough that it should be possible to get a good match - or at least see how realistic the colours displayed are.

Euro notes.

So here I present to you the Money Matching Scheme for the colour sample cards - and if you like, give the colour adjustment a try and let me know if it worked for you!


0
APR.
18
2

Oh the Tiny Fun.

I am sure that knitting for babies is something that oodles of other knitters have discovered for themselves during hundreds of years, and now it was finally my turn. Yes, that was not very long ago, but I think I can be excused for that - after all, I haven't been knitting for so long.

First of all, babies have one definitive asset for being knit for: They are small. Really small. And while knitting something small might be a tad fiddly, it is really fast work - after all, there's so many less stitches in a sock for a 3 months old than a 30 year old.

And secondly (and I think that's even more important), they don't want a say yet in what they will be wearing. As long as it fits (more or less) and is the proper warmth for the ambient temperature, it will be okay.
And they are not walking. Which is the go-ahead, the carte blanche, the glorious licence to do some really outrageous knitting. If the parents are amused by it and like it - that's what the wee one will wear (at least until he or she wiggles out of it).

So... I used part of the weekend for some tongue-in-cheek stealth knitting project. Which is not so far from being finished, though there's still a gazillion of ends to weave in and finishing touches to be done. Photos will follow after the real-life reveal, which will hopefully be soon.
0
APR.
14
2

When in Doubt...

I think I am now going to invent a new blogging rule. A very easy one. It goes: When in doubt what to blog about, post pictures of yarn.

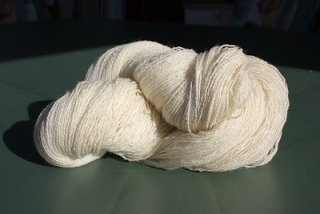
So I'm doing that. I weighed the skein of yarn yesterday, and it has 65.1 grams on its 595 metres of two-ply.

That's what the skein looks like now:

(Click the pics for the larger versions.)


And then, I just wanted to know. Exactly. So this is what happens if you match a skein of yarn with a visual survey card for threads.


Now these cards are... let's just call them unforgiving. Because you have white threads on black background, and because the threads are absolutely evenly spaced out, you can see every irregularity. You can see them so well that these cards are used for visual survey of machine-spun, industrial yarns - and those have very, very little differences in thickness.

Which means that while the yarn on the card might look quite irregular... I'm actually more or less content with the yarn. There are a few thinner-than-planned-for bits in it, and a few places where the plying could have been more even, but overall, I'd say it is pretty good quality.

And I'll probably hang that skein into my market stall with a note attached to it giving the time that it took to spin it. That should get some reactions - at least from the spinners.
0
APR.
12
3

Fair prices for handspun?

A while ago, I mentioned that I've done a bit of wheel spinning again for a change. After a long while (felt like forever) of spinning to more or less fill two bobbins with single, I'm now in the plying stage.

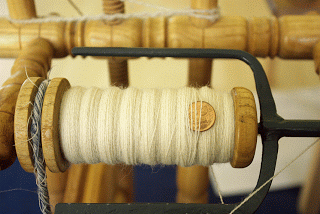
This


is what it looked like after two hours of plying work. After three and a half hours of plying, the bobbin was more than full - it had a bulge in the middle. (Of course I forgot that I wanted to take a picture. Only natural to grab the swift right away, right?) The result is 595 metres of 2-ply yarn, and it's roughly about 28 wraps per inch. Since I gave it a soak right away to relax the fresh ply, I can't weigh it yet, since it's not completely dry this morning.

However, the plying time has made me think about pricing of handspun yarn again. Six hundred metres of yarn took three and a half hours of plying. If I do a very rough calculation and suppose that spinning took one and a half times the work time of plying (I'll time a bit of spinning next time), then that means roughly fourteen hours of work total. That is one and a half workdays for sixhundred metres two-ply! And that's wheel spun with industrially prepared merino wool, so no additional prep time required plus a relatively fast and efficient spinning tool.

Fourteen hours work - now what would you pay for a skein of handspun wool like that? Probably not my normal hourly rate times fourteen, and my normal hourly rate is not very high at that. And if you look at etsy or dawanda or any other shop, stall or market, you can see handspun yarn roughly half the length offered up for less than 20 Euro. (Oh, it's hand dyed as well.) Spinning rates seem to go up to a stunning 20 cents per metre - but you can have it cheaper, too.

Now, my little wheel is not the fastest one on this earth, and I'm not trying to spin as fast as humanly possible. But let's do some maths. One hour spinning and plying time taken together will let me end up with about 42 metres of two-ply yarn. If I sell that for 20 cents per metre, I will end up with the stunning sum of 8,40 Euros for one hour of my work. Plus the material needed - and I also need the tool to work with, of course. So let's say eight of the Euros remain as "winnings".

And now there's the snag. While 8 Euro per hour might sound not too bad at the first second, what you technically are as a spinner is... a freelancer. And that means you will have to calculate so that you can pay everything yourself - your health insurance (where usually your work/your boss will pay half, if you have a fixed job), your working tools, your stockpile, your vacations; you will need to make enough money so you can cover the times you are ill or some time off that you need to recover and recharge your batteries. Oh, and maybe some day you wish to be old and pensioned? Go pay for your own pension account, then. And if you make enough money for all of that, keep in mind that you will also have to shunt off the VAT from your selling price - and that's between 15 and 21% in Europe. (In Germany, those 8,40 Euros would mean 7,05 Euros for you.)

That is much, much too little money for that work. Ask any freelancer. Go read any freelance advice column, or webpage. And too little money for work - that's not healthy, and it's not good for the economy nor society. Plus too little money for textile work also furthers the underestimation and the undervalueing of this line of work that is so widespread today.

So... provided every spinner around that sells his or her own handspun yarn (and I'd bet it's mostly female spinners here) doesn't work at least three times faster on their spinning wheels than I do... they sell their work under price. Vastly under price.

That always leaves me more than a little sad. Hand spinners, please value your work correctly!

This blog post was the starting point for a series about fair pricing in crafts. Read the start of the series here.

0
MäRZ
30
1

Things happen. Yes really.

A long time ago, when I was in school, there were subjects I did like better than physics. Or mathematics.

And then, after finishing school, I started studying medieval archaeology. Hey, that's something where you don't need maths or physics for, right? That's what I thought.

This does not hold true, though, if you do heritage conservation as your "side study" course. Because once you go out and start measuring up the building, you need to lay a basic grid to start with. And that basic grid has to be right - so there's maths to calculate the angles and, even more importantly, to calculate the accuracy of your work. (Not accurate enough, you do it again.)

And you don't need physics only if you don't want to do experiments with spindles. (Or other things, probably.) So now I'm reading up on spinning physics for spinning tops and getting tutoring from the Most Patient Husband.

Which proves, again, two points that I did learn some good way back: Physics can be totally fascinating, and there's nothing that won't come in handy somewhere for doing archaeology.
0

By accepting you will be accessing a service provided by a third-party external to https://www.pallia.net/

Kontakt