
Latest Comments

Guest - Aislinn Dyestuff Citizen Science.
09. Oktober 2026
This is a great project. I look forward to the results. Thanks for letting us know.
Guest - Aislinn Time for...
09. Oktober 2026
Looks delicious!
Guest - Katrin Sprang Discussion
18. September 2026
Hi Rachel, I have looked for more photos of you, but that was not very successful. I found a link on...
Guest - Beatrix Sprang Discussion
15. September 2026
That lozenge pattern element is not a photograph, but a scan. So it should be to scale. But I pinned...
Guest - Katrin Sprang Discussion
15. September 2026
I was not referring to Rachel's reconstruction (is the reconstruction you refer to the one photograp...
MAI
06
0

Hairnet finished - well, almost...

The red-and-white hairnet that I've been working on is finished apart from the last finishing touches. I put in the last knots during Freienfels, and I started another one right away - same mesh size, but thinner thread. The plan is to put pearls in the mesh of the new net.

First of all, here's the photo of the finished piece. It turned out with a diameter of a little more than 30 centimetres when laid out flat on a surface, and it took 29 and 3/4 hours to get it to this stage, net working time since I work with a stopwatch. (I miscalculated during the weekend and told people a larger amount of time. I'm not happy about that, since I like to get my numbers right, but I'm still content that I erred on the side of longer work time. And everybody watching could see how long it takes to make the mesh...)
It is still lacking a band that will be attached to the mesh in front of the net and drawn through the longer loops on the back of the net - this allows some width adjustment when wearing the piece. It also still needs the finishing touches: a proper crown closure with silk thread (there's still the pink cotton thread in it that I used as a foundation loop), snipping off the rest of ends, and wetting it down to dry set over a bowl or something similar almost-head-shaped.


On this closeup, you can see the colour change between red and white, marring the impression that the net is worked in the round.
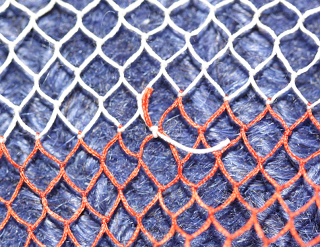

I'd say that an unadorned, simple net might well be worked in a spiral, since it will take very hard looking to see that: In the crown section, there's too much thread on too small an area, and the lower end of the net, if stitched to a band or sporting longer loops for closure, will not be easy to read. For any net that will show different size mesh, colour changes or embroidered patterns, spirals are out of the game, because they are just irregular enough to show. And according to my experience, netting in the round will not take much longer - there's only one slightly more fiddly point once each round where you transition into the next row; compared to the amount of time needed to complete the round, the slight slow-down there is not even worth mentioning.

Edit Jan 21, 2010: This is not correct - there is evidence that nets with colour changes and different size mesh and what-have-you were also netted in a continuous spiral. Please see update here.
0
APR.
24
0

Hairnets, part V

TimeZM4 for a little sequel for the hairnet series - all because we did a little math yesterday...
I met up with the lady who did my netting needle, and I have ordered a really teeny slim one - suitable for making very fine mesh. Think Sint-Truiden: think this net:


It is listed as catalogue nr. 102, made of silk thread in rose and beige and almost fully embroidered with silk in grey, beige and white. Mesh size? The publication states 64 mesh per square centimeter, which translates to very little more than one millimeter mesh size! Now that is tiny.

The little math yesterday I hinted at? We tried to calculate how long making such a net would take. The following number crunchies are probably not accurate, but meant to give me (and now you) an idea about how much of a time-sink something like this piece can be.

The basis for our calculation was the net I have almost finished, with the mesh size of 4 mm. For this net, I can pretty safely state about 30 hours for the net until completion, including wetting and setting the finished net. When calculating the same overall size for the tiny-meshed net, I'd need about 16 times the amount of single meshes for the tiny net (since there would fit 16 meshes into one large mesh). Which means 16 times 30 hours, that is 480 hours just for the base of the hairnet! Add to that the embroidery, which I'd guess takes at least as long (maybe one of the embroidering people can pitch in here) - that would leave you at roughly one thousand hours of work just for a puny hairnet.

For sake of comparison, let's translate this into a modern working schedule, with a five day week, fourty hours work time each week. That means twentyfive weeks of work, full-time, provided you really work for eight hours a day on the net, with no distraction whatsoever. Let's add in a week for all the rub-your-eye breaks, breaking threads, bad hair (netting) days, and tea-and-cookie breaks. That means one skilled textile person will work half a year, full-time, nothing else done, just for the puny hairnet.

And people seeing such a net in medieval times will know what this means. How much work this means - and thus, how much money.

So wearing this puny hairnet is something like putting a Ferrari into your garage. Wearing this little beauty is like really thumping the table with your bag of gold, so to speak.

Source: DECONINCK, E., GEORGE, PH., DE JONGHE, D., Y., VAN STRYDONCK M. J., WOUTERS, J., VYNCKIER, J. und DE BOECK, J.: Stof uit de Kist: De Middeleeuwse Textielschat uit de Abdij van Sint-Truiden. Leuven 1991. Catalog nr. 102.
0
APR.
22
0

Dag it, baby, one more time...

As I wrote Tuesday last week, I'm into sealing cut edges with wax now.

Yesterday, my brand new (and infernally sharp) pinking tool arrived. (Well, I call it a pinking tool. It disguises itself, though, as a woodcarving implement and hides in woodworking catalogues. But I found it nonetheless!)

I set to work pinking the dagges on a hood. The cloth is heavy silk, dyed a beautiful purple with natural colours. Pinking dagges is fun, and the tool will bite easily through several layers of the cloth at once, but it sure pays to work carefully. That will save a lot of snipping off missed threads afterwards and re-pinking missed spots.

After doing the dagges, I set to work with the wax. What I want is a nice contour of molten wax along the edge of the cloth, hot enough to go into the fabric a bit (to make sure the edge is conserved) but not so hot that it will actually be visible on the outside of the piece. As you can probably imagine, the margin between "too cold" and "too hot" is very slim - so slim that it makes a huge difference whether the tjanting is full or half-empty, even if it is a very small one. With these low temperatures, flow in the tjanting might become obstructed by cooling wax, so there is also a rather big variation in how much wax comes out, and how quickly. While this method is a lot faster and much more reliable than the molten-wax-on-copper-plate method, it demands full concentration and a good sense for when the whole shedoodle is the right temperature (or lots of testing, which is much easier for the beginning). Maybe there is a better method to do this. Maybe there's even a description on how to do it somewhere out there... if you know of one, please share!

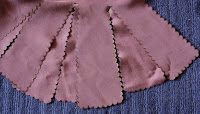
I finished the dagges on the hood cape yesterday, including the waxing, and I finished pinking almost all the dagging for the liripipe, so there's some more waxing on today's agenda. This is how the finished and waxed dagges look:

click for larger view


I rather like the look of it.

Oh, and on an aside: Dyeing the fabric seems to have done something for the shine on the not-so-shiny side of the fabric, and I didn't expect that at all. The photos, of course, don't do the colour justice.
0
APR.
20
2

Hairnet, current status

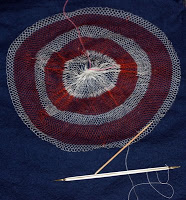
Here's a picture of the current status of the hairnet I'm working on. Only about three centimeters left to net, hooray!

Picture clickable for larger view


As you can possibly see (the photos are not that good), the net is worked in a spiral. The spiralling approach has its advantages, but also a fair share of disadvantages, in my opinon.
I like the fact that, when spiralling, you can just go on and on with netting. Once the spiral is properly established, there is no need to fiddle with the mesh size for the transit into the next row, there are no double threads or new knottings-in for this transition, just netting same size endlessly.
What I don't like is that you will get distortions in the first few rows, until the spiral is smoothed out. That can be achieved either by slowly lengthening the cast-on loops so that the first normal-sized meshes don't stick out so much, or by fiddling a bit with the mesh size in the first rows. And the finish of the net is, of course, also a spiral and will need some more fiddling to look smooth and well-rounded.
Spiral netting is also not too well suited to colour changes in the netting - exactly what I did in this piece, just because I felt like using two colours. Where the colour change is, you always get an abrupt change in one of the percieved "rows", and I think it looks a bit sloppy, or disorganized. It is technically not possible to change this when working spirals; there is no sudden change in one row when working circular. So for multicoloured nets, circular might be better.
And the last thing I don't like now that I'm nearing the end: There are no rows, and hence, there is no feeling of accomplishment on finishing a row. What can be seen as an asset of spiral netting - not needing to transit between rows - can feel tedious. I know that I need about 6 or 7 more rounds in the spiral, but it is awfully hard to keep track how much I have netted in one session.

Taking all this together, I personally feel that netting in the circular would be more appropriate for what I'm trying to get, while netting in the spiral might be the best way for a beginner to make a nice practice piece, only needing to concentrate on the act of netting nice even meshes. Therèse de Dillmont doesn't give instructions for spiral netting; her circular netting "recipe" says to knot in anew for every next row.

After this last stint of spiral netting, I'm not so sure whether it was used as an approach for net-making in the middle ages. It would be interesting to look at some of the extant nets in detail to see whether there is a shortened transit mesh or new knotting in of the thread for the next row, or if there are actually nets worked in the spiral.

The last picture shows the size of the meshes in the net, with the net laid out on a normal 5 mm grid paper. Sorry for the bad quality of the picture.


You can see that the mesh size is approximately 4 mm. I think this is a nice size, still easy to work with a fairly sturdy netting needle, within the size spectrum of medieval hairnets and not so small-meshed that it would take ages to do it. However, netting is not a fast craft, and even with this mesh size, it will take its time. Practice speeds the knotting a bit, but there's a limit to how fast your hands can go. I'll give the exact time needed when I'm all finished with the net, but by now it has taken more than 25 hours.
0
APR.
15
2

Measuring Tape revisited

In a comment to the measuring tape post, Piia linked two pictures from Tacuinum Sanitatis, both featuring an ell stick lying around in a tailoring workshop.

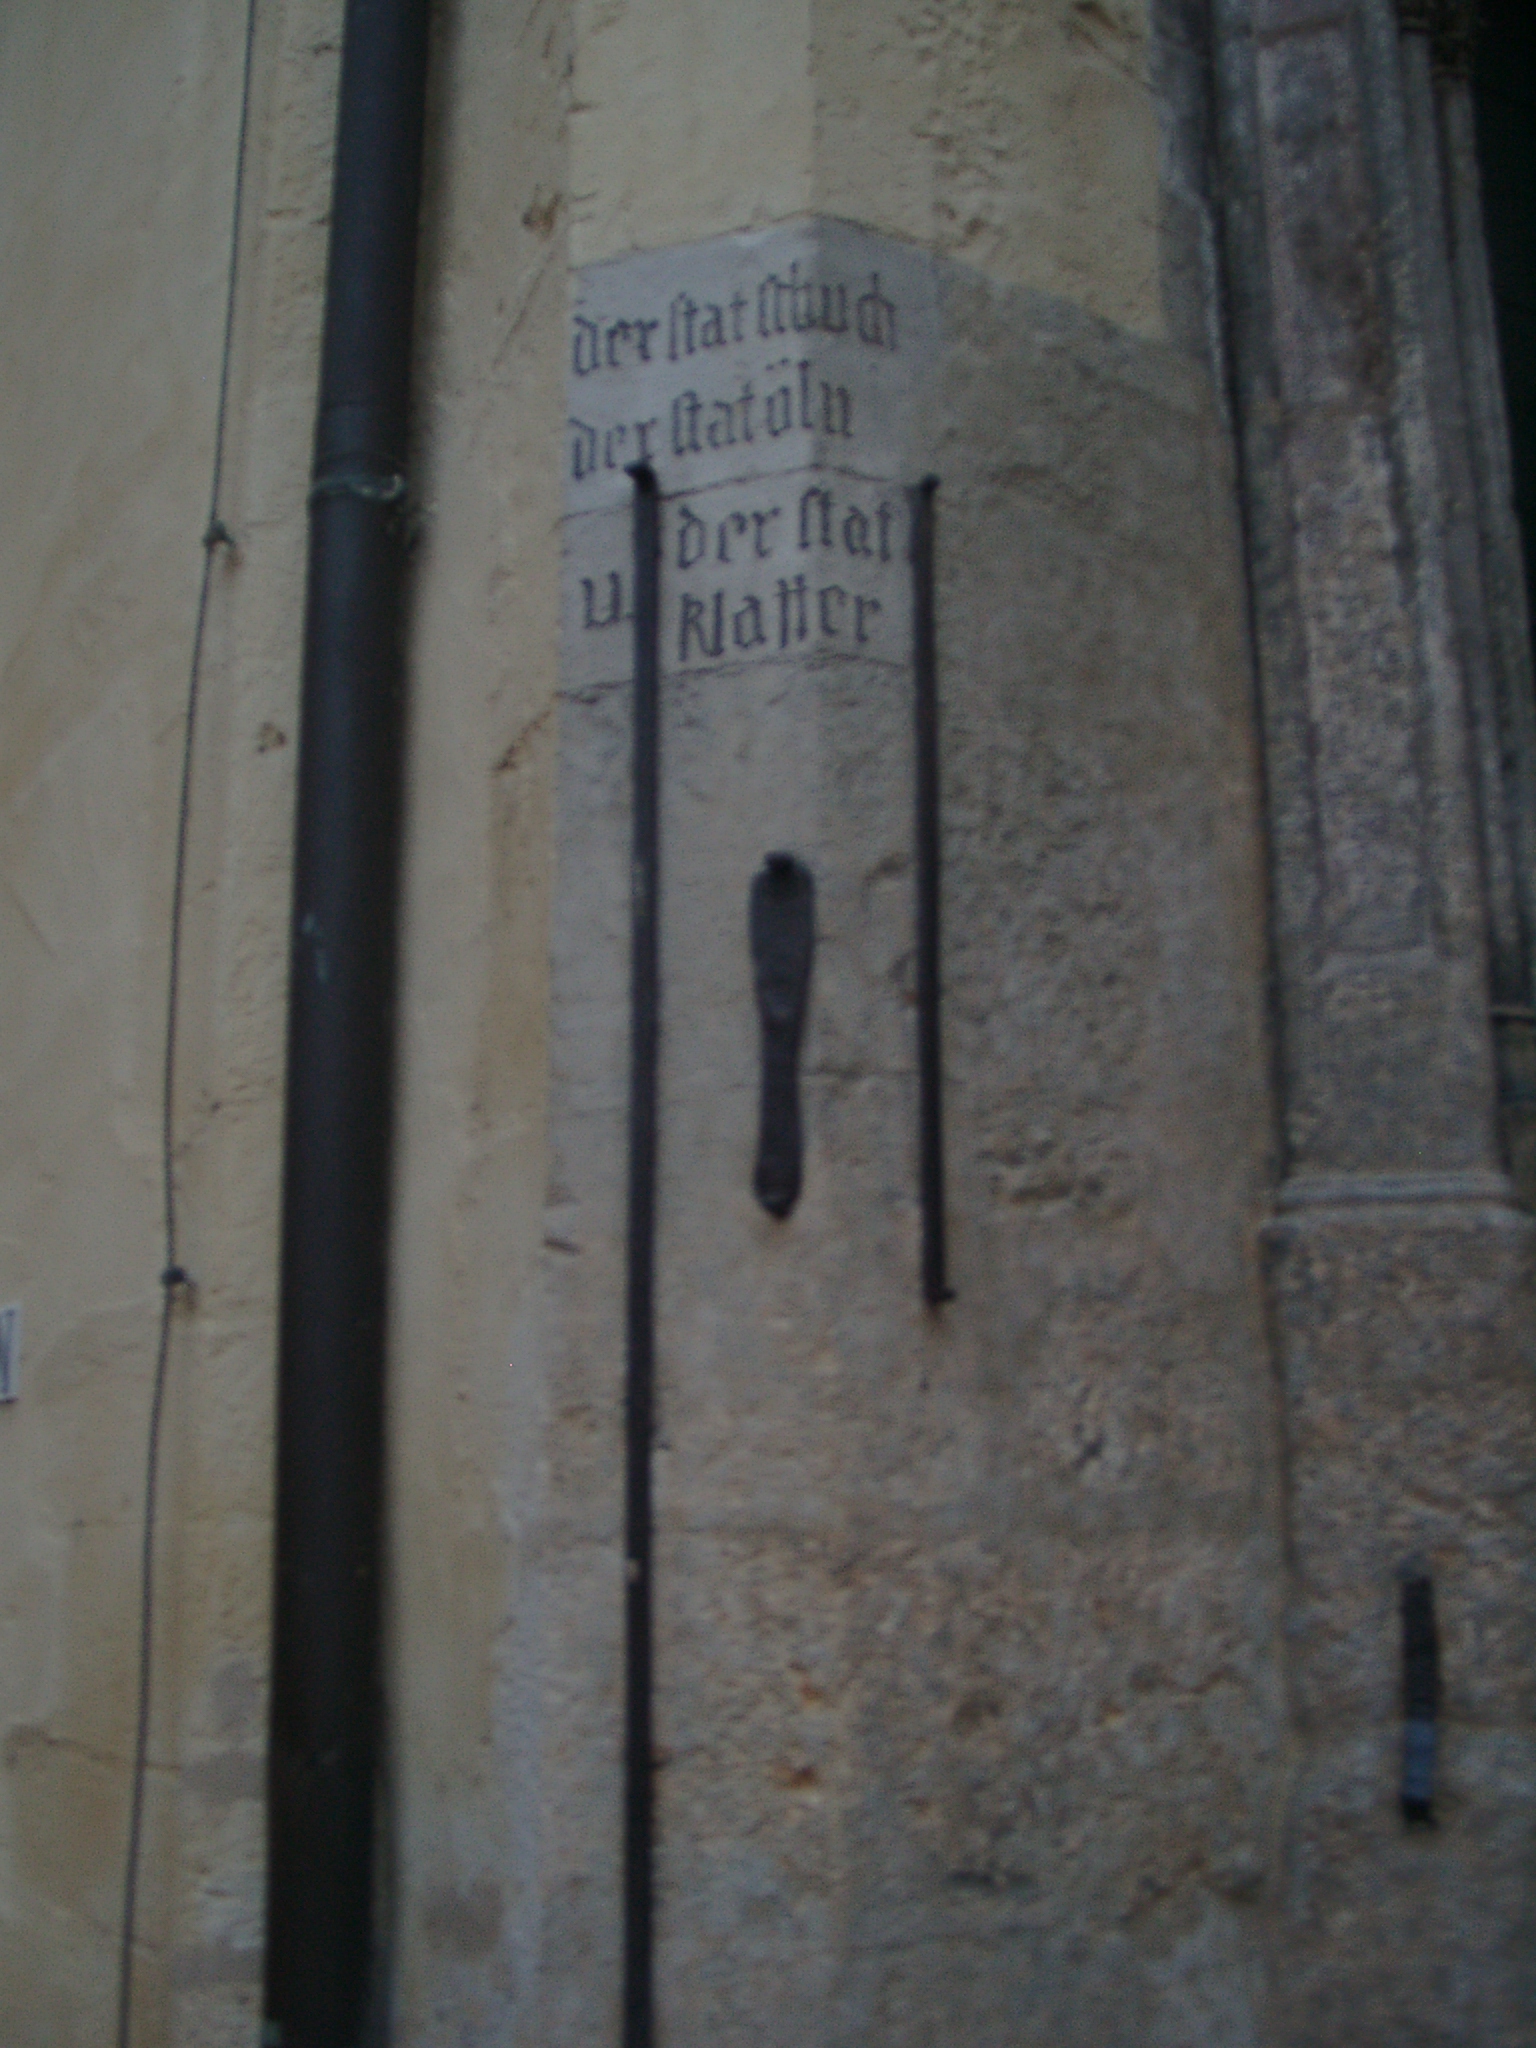
Measuring sticks like these are still in use today for measuring the cloth off the bolts. The "ells" that are the basic unit for these measuring sticks are in some cases still marked out on a medieval church wall or the town hall, since the exact length of the ell could differ from region to region.

Regensburg ell, foot and fathom. Photo by Klaus Graf, via Wikipedia.

An ell stick would be easy to make: Take a suitable piece of wood, walk out to the town hall and mark the length of the local ell on your stick. Use this for measuring cloth - it is very handy. You could, of course, bring a piece of string instead of a piece of wood and mark the ell on the string, but for measuring out a piece of fabric to cut from a bolt, the ell stick beats the string hands down - much faster and easier to use. Plus you won't get a knot into the stick by accident.

There is no scarcity of evidence that cloth was measured in ells, and it is pretty logical that the ell would be divided into half, quarter ell etcetera. The markings on the ell stick of one of the pictures linked by Piia look to me like they might mark eigths of an ell. But that does not mean it is similar to a modern scaled measuring tape.

One difference between the ell stick, maybe divided up in half, quarters etcetera and a cm- or inch-scaled tape are the starting units. With the measuring stick, you'd start with the ell as base unit, while a modern tape uses inch or cm. The small modern units are just counted up and up - 25 inch, 135 cm - while the larger ell as base unit gets divided. However, there is a limit to how much dividing is useful. Half an ell? Surely. Quarter? Yes. Eighth of an ell? Will still work. A sixteenth? Hmm... that is already getting pretty small, and quite hard to count. But with a thirtytwoth of an ell, at the latest, your stick is going to have so many markings that it will be not too easy to handle anymore. And such small unit divisions might not be necessary - after all, when you buy cloth in a modern store, you usually buy in half meter increments. If you'd need really small units, you could switch to inches (or "fingers" or whatever is in use in your region) and have a conversion into ells, like feet make a yard and inch make a foot in the British measuring system.

Today, we have a centimeter or inch scale, with the unit meaning the same everywhere - so if I tell you "24 inch", you know exactly how long my thing is. This - together with high-precision printing and plastic materials - makes it easy to produce measuring tapes suitable for everybody and withstanding lots of use.

For the middle ages, this is not the case - there is no common unit of the same length everywhere. So if I told you "one ell", that could mean anything between about 40 cm and more than one metre, depending on what ell I'd use (though most are somewhere between 45 and 70 cm in length). Add to that the fact that textile bands used for measuring might stretch over time, and the fact that taking a measurement and writing down the number is almost surely a very modern way of doing it: You could also mark the length measured on a string or band or strip of whatever else you are using for measuring each client, and then keep the marked-up string for using on your project and maybe for future reference. So there might not have been any need to make a measuring tape like we are relying on today.
0
APR.
14
0

Yummy Chocolate Easter Eggs!

I really enjoyed the Easter days - Yummy Chocolate eggs, all my family coming together, and glorious weather.

And some productivity, too: Good Friday was spent playing around with cloth in nice company. Sitting around doing strange things to textiles is just so much more fun when you're not alone in the room.

Since Friday was technically a day off, I found the time to play around with wax for sealing and securing cut edges. There are some hints that beeswax was used for this in the middle ages, and I've long wanted to give it a proper try. I did use wax twice before: Once on the kruseler I've made, and once more to seal dagges cut from fine silk cloth. I'm still not sure on how it was done in medieval times, though.

In those first tries, I applied the wax by rubbing some beeswax onto a relatively hot copper plate and then dipping the edge of the fabric into the molten wax. It was pretty hard to control how much wax would come in at once, and it took a rather long time, with uneven wax rims. But it worked, for the straight edges as well as for the oakleaf dagges.

I have recently acquired a tjanting, the Indonesian wax applicator for batik, and I have used that for my last wax application. It is a bit tricky to get the temperature just right (especially when the candle flame used to heat the tjanting is not too cooperative), but it was a lot more convenient than the copper-plate version. And now I'm wondering: In what extent was wax used to neaten and conserve cut edges? With what types of fabric, and in which cases? And how did they apply the wax back in the middle ages - is there a medieval European equivalent to the tjanting that was not yet identified, because nobody expects the Spanish Inquisition a wax application tool in a tailoring/silkworking context?
0
APR.
06
3

Finally finished!

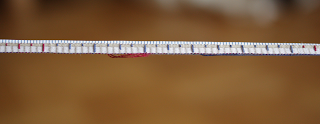
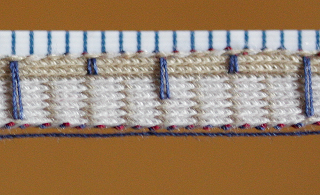
Friday evening, I finally finished the tabletweave I was hinting at - and here's the virtual unveiling now:

(click to enlarge)

Yes, I have woven a measuring tape.

Now, first of all I need to get my disclaimer in. The first surviving measuring tapes are dated postmedieval, and there is no evidence at all for the use of scaled measuring tapes of whatever material and manufacture during the middle ages. So why have I spent hours weaving a wild speculation?

The tape is for a friend and colleague in medieval crafts, a shoemaker who would like to use something a little less blatantly modern than a plasticised shoemaker's measuring tape. A good while ago, we chatted about the difficulties and the possibilities, and I thought about an overly long warp that I still had lying around. We agreed that I would try to weave him a scaled measuring tape, since he has to write down the measurements he takes to work with them at home, thus needing a reliable scale. The measuring implement should be rather stretchproof and, if possible, flat - so a piece of string with knots in seemed to both of us to be not really suitable. We also agreed, though, that a nice slim tablet weave might do the trick. So after straightening out the warp and re-threading the weft in the tablets in a different pattern, I started out on the preliminary tests for weaving an inch-scaled tape.

Technically, this is very, very simple. You just need to find a material and pattern that will be fine enough to give you bars across the weave at suitably small intervals, find a way to brocade the markings for quarter, half and full inches so that the additional or missing brocade thread will not distort the pattern, and then weave while turning the tablets in one direction only to get an undistorted and firm pattern band. Since even a tablet weave will stretch slightly under tension, you have to keep the tension on the warp so low that the stretching is not noticeable.

I had a bit of luck, because the warp that I had would give me the bars at one eigth of an inch with very little persuasion. I figured out a way to brocade with no distortion by looping parts of one weft thread over the surface of the pattern (essentially a Munter Hitch over the threads on top of the weave) and set markings at quarter, half and full inch intervals, with a colour change every five inches. And then it's just weave, weave, weave - and unweave once in a while.

The main problem with the piece were tension and regularity of the weaving, as you can probably guess. I had to unweave several bits during the weaving, which is a pretty frustrating experience. Every glitch has to be rectified. Left out a weft, accidentally? Disturbs the pattern way too much. Warp tension too high? Same thing, unweave and re-weave with the (hopefully) correct tension. Not beaten the weft in enough? Undo and re-weave.

Now I hope that the tape will do a proper job for measuring feet and marking out patterns for new shoes. I have already decided that I won't make a full length tape for my own use, thank you very much: 24 inch of technically simple, but demanding full attention weaving has been enough for me. I'm happy that it turned out okay, though.

(click to enlarge)

Finally, for those of you who are interested, here are the gory details: Both warp and weft threads are Gütermann Silk No. 100 (comes on blue plastic spools). Warp in colours white, light and dark beige, weft threads in blue and red. 17 tablets, threaded alternatingly s and z, turned in one direction only for the whole band. Length are 24 inch plus a little (as a "handhold" for better handling) at the start and at the end. Accuracy was helped by a regular plastic measuring tape that I clipped to the weave with foldback clips.
Should you repeat this stint, please send me a note about how you're doing and maybe a photo - I'd love to hear how you find it.
0

By accepting you will be accessing a service provided by a third-party external to https://www.pallia.net/

Kontakt